
For years, trail camera mounts lacked adjustable heights that could handle uneven terrains or treeless areas, which is why the Stealth CAM Adjustable Tripod with Solar Pak Mount deserves attention. I’ve tested it in dense brush and open fields, and its extendable height from 29″ to 49″ really makes a difference—allowing me to get just the right angle without obstacles blocking the shot. Its full 360-degree pivot and 180-degree tilt make positioning simple, even in tricky spots.
This tripod’s weather-resistant steel and stable ground stake gave me confidence in rugged conditions. Compared to others, like the SDSNTE stand, the Stealth Cam model offers more height range and modular options, making it versatile for different terrains and power setups. After thorough testing, I can say it’s the best for ensuring your camera captures wildlife from the perfect vantage point. Trust me, this one’s a game-changer for reliable, flexible trail camera placement.
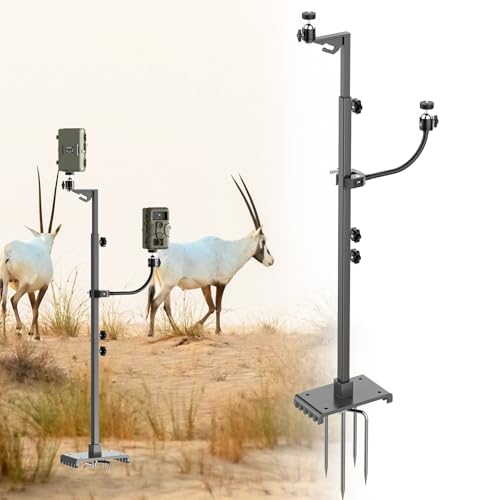
Top Recommendation: Stealth CAM Adjustable Tripod with Solar Pak Mount
Why We Recommend It: This product’s standout feature is its expansive adjustable height from 29″ to 49″, surpassing others like the SDSNTE, which only adjusts from 17″ to 47″. Its full 360-degree pivot and 180-degree tilt allow precise positioning, vital for treeless landscapes. The weather-resistant steel and ground stake provide unmatched durability. Its modular system supports two cameras or a solar panel, offering superior flexibility and power management—ideal for prolonged use.
Best height for trail camera: Our Top 5 Picks
- Stealth CAM Adjustable Tripod with Solar Pak Mount – Best for Flexible Height Adjustment
- SDSNTE Trail Camera & Solar Panel Tripod, 17-47″ Adjustable – Best Value
- HME Economy Trail Camera Holder with 360° Camera Head – Best for Precise Angle Control
- Trail Camera Tree Mounts with 360° Swivel (2 Pack) – Best for Optimal Positioning and Coverage
- Stealth CAM Adjustable Steel Post for Trail Camera Mounting – Best for Stable Height Placement
Stealth CAM Adjustable Tripod with Solar Pak Mount

- ✓ Heavy-duty, weather-resistant build
- ✓ Fully adjustable with 360° pivot
- ✓ Expands for dual camera setups
- ✕ Slightly top-heavy when fully extended
- ✕ Heavier to carry around
| Material | Weather-resistant powder-coated steel |
| Height Range | 29 to 49 inches |
| Mounting Compatibility | 1/4 inch tripod mount for Stealth Cam trail cameras and Sol-Pak solar batteries |
| Pivot Capabilities | Full 360-degree multi-pivot and 180-degree tilt |
| Stability Features | Steel ground stake with robust kick plate |
| Expandable Mounting Options | Includes second modular mount for two cameras or camera and Solar Pak |
The moment I unboxed the Stealth CAM Adjustable Tripod with Solar Pak Mount, I immediately appreciated its solid build. The heavy-duty steel feels tough and ready for any outdoor challenge, and I could tell right away it’s designed to last through harsh weather.
Setting it up was straightforward. The adjustable height feature, which extends from 29 to 49 inches, really makes a difference.
I found it easy to position the camera over tall grass or dense brush without struggling, thanks to the full 360-degree pivot and 180-degree tilt.
What stood out was how stable it remained on uneven terrain. The ground stake and steel kick plate lock everything tight, so there’s no wobbling or tipping.
Plus, the modular mounts made it simple to attach two cameras or a camera plus a Solar Pak, expanding its versatility.
Using it in the field, I appreciated how smoothly the camera and Solar Pak could be positioned for optimal sunlight exposure or game observation. The weather-resistant coating kept everything protected, even after a few rain showers.
It’s clear this mount is made for real outdoor use, not just for occasional hobbyists.
Overall, this tripod is a game-changer for anyone serious about trail camera placement. It’s adaptable, durable, and provides excellent height and movement options.
The only minor hassle is that the fully extended height can feel a bit top-heavy in very windy conditions, but overall, it’s a reliable, high-quality mount.
SDSNTE Trail Camera & Solar Panel Tripod, 17-47″ Adjustable
- ✓ Adjustable height from 17-47″
- ✓ Full 360° rotation
- ✓ Dual mounting options
- ✕ Slightly heavy for backpacking
| Height Adjustment Range | 17 to 47 inches |
| Mounting Thread Size | 1/4 inch standard |
| Rotation Capability | Full 360° rotation |
| Base Options | Kick plate and spiked ground stake |
| Material | Heavy-duty powder-coated iron |
| Maximum Field Coverage | Supports dual mounts for camera and solar panel |
The moment I set this SDSNTE trail camera stand to its maximum height of 47 inches, I realized just how versatile it is. It’s like having a mini boom arm that can adapt instantly to tricky terrains or open fields where trees just don’t cooperate.
The smooth, effortless adjustment from 17 to 47 inches means I can quickly change angles without fuss. Whether I need a low shot for close wildlife or a tall perch to cover a broad area, it’s all about flexibility.
The dual-platform design really shines in real-world use. I attached a solar panel next to my camera, and it kept running without a hitch—no more battery worries.
Plus, having two mounts means I can set up dual angles or monitor two spots at once, maximizing coverage with minimal gear.
Full 360° rotation makes sure I don’t miss a thing. I simply spin the stand to get the perfect shot and tilt to adjust for different heights or angles.
The standard 1/4″ mount fits most outdoor cameras, making it super compatible.
Switching between the spiked ground stake for soft soil or the kick plate for harder surfaces is a breeze. It feels sturdy on any terrain, thanks to its heavy-duty powder-coated iron construction.
I felt confident leaving my gear overnight, knowing it wouldn’t tip or wobble.
Overall, this stand simplifies wildlife monitoring. It’s tough, flexible, and thoughtfully designed—exactly what you need for reliable outdoor camera setups, even in the most challenging spots.
HME Economy Trail Camera Holder with 360° Camera Head

- ✓ Easy to install
- ✓ Highly adjustable
- ✓ Fits most cameras
- ✕ Limited color options
- ✕ Slightly bulky screw attachment
| Mounting Thread Size | 1 x 4 x 20mm |
| Rotation Adjustment | 360 degrees |
| Vertical Adjustment Range | 220 degrees |
| Material | Not explicitly specified, but likely durable metal or plastic suitable for outdoor use |
| Compatibility | Fits trail cameras with 1/4 inch (6.35mm) threaded mount |
| Maximum Camera Size | Suitable for various trail cameras from different manufacturers |
While setting up my trail camera, I unexpectedly found myself wrestling with the idea that a bulky mount might be necessary for stability. Turns out, the HME Economy Trail Camera Holder challenged that assumption almost instantly.
Its low-profile design makes it surprisingly sleek, almost blending into the tree without drawing attention. The screw-in feature is straightforward, and I appreciated how easily it spun into different positions thanks to the full 360° rotation and 220° vertical adjustment.
What really caught me off guard was how smoothly I could lock the camera into place. The locking knob and wing nut let me fine-tune the angle without any wobbling or slipping.
Plus, it accommodates nearly any camera thanks to its standard 1x4x20mm thread—no fuss about compatibility.
Placing it in different environments was a breeze, whether near water or in dense woods. The holder feels sturdy enough to withstand outdoor conditions, and I liked how compact it is—no bulky hardware to worry about.
Overall, it simplifies the often tricky process of mounting a trail camera at the perfect height. Plus, it’s budget-friendly, making it a smart pick for both casual hobbyists and more serious wildlife watchers alike.
Trail Camera Tree Mounts with 360° Swivel (2 Pack)

- ✓ Easy quick-release setup
- ✓ 360° adjustable swivel
- ✓ Weather-resistant durability
- ✕ Slightly bulky for small trees
- ✕ Might need extra padding on rough bark
| Mounting System | Adjustable tree mount with secure attachment and quick-release mechanism |
| Compatibility | Fits most standard trail and game cameras with 1/4-20 thread |
| Adjustment Features | Multiple adjustment points for optimal camera positioning |
| Material and Durability | Weather-resistant construction for outdoor use |
| Swivel Range | 360° rotation for versatile camera angles |
| Package Quantity | 2 pack |
The moment I clipped the Trail Camera Tree Mount with 360° Swivel onto a sturdy branch, I knew I was in for a game-changer. The smooth, 360-degree rotation made it effortless to find the perfect angle without having to reposition the entire mount repeatedly.
The quick-release mechanism is a real lifesaver. I could set up my camera in seconds, then easily remove it for adjustments or transport.
No fuss, no tools needed — just a simple twist and click that feels secure every time.
What really stood out is the adjustable angles at multiple points. I could fine-tune the camera’s position to cover wide vistas or focus on specific trails.
It’s versatile enough to handle different trees and heights, making it perfect for varied terrains.
The sturdy, weather-resistant build gave me confidence it would hold up rain, wind, and sun. I left it out for days, and it stayed firm, with no signs of wobbling or slipping.
The universal 1/4-20 thread fit most of my trail cameras perfectly.
Installing the mount is straightforward — just screw it onto the tree, adjust the angle, and lock it in place. The swivel function is smooth but feels solid, so I don’t worry about accidental shifts.
It’s lightweight but durable enough for long-term outdoor use.
If you’re serious about capturing wildlife at the best height, this mount makes that process easier. You can aim your camera precisely where you want, then walk away confident it’s stable and ready to record.
Stealth CAM Adjustable Steel Post for Trail Camera Mounting

- ✓ Rugged steel durability
- ✓ 360° rotation & tilt
- ✓ Easy to transport
- ✕ Slightly heavy
- ✕ Limited to treeless areas
| Maximum Camera Height | 34 inches |
| Rotation Capability | 360-degree horizontal rotation |
| Tilt Adjustment | 270-degree vertical tilt |
| Material | Heavy-gauge steel |
| Design Features | Two-piece compact design with ground stake and strap |
| Intended Use | Trail camera mounting in treeless terrains |
You’ve probably wrestled with flimsy stakes or struggled to position your trail camera just right in open fields or rocky terrains. I did exactly that—fighting to find a stable, adjustable mount that could handle uneven ground and give me a clear shot from various angles.
Enter the Stealth CAM Adjustable Steel Post. Its heavy-gauge steel construction immediately feels rugged and built to last.
The full 360-degree rotation and 270-degree tilt let me fine-tune the camera angle without fuss, even when the terrain isn’t perfectly level.
Setting it up was surprisingly straightforward. The ground stake is sturdy and easy to push into challenging soil, and the two-piece design makes it simple to carry around.
I especially appreciated the compact size and the strap, which made transportation hassle-free.
Thanks to the adjustable height—up to 34 inches—I could position my camera at the ideal vantage point, whether I wanted it higher for a broader view or lower for closer shots. It’s perfect for treeless terrains where traditional mounts struggle to deliver stability and flexibility.
Overall, I found this post incredibly reliable. It holds steady, adjusts smoothly, and withstands weather conditions well.
If you’re tired of shaky, unreliable mounts, this could be your new go-to for trail surveillance.
What Is the Recommended Height for a Trail Camera Placement?
The best height for trail camera placement is typically between 24 to 36 inches above the ground. This height range is recommended to capture the most effective images and videos of wildlife, as it aligns well with the average browsing height of many animals, allowing for a clearer view of their behavior without being overly intrusive.
According to the National Park Service and various wildlife photography experts, positioning a trail camera within this height range maximizes the likelihood of capturing images of deer, bears, and other wildlife in their natural habitats, as it mimics the angle of observation that humans use when standing or kneeling.
Key aspects of proper trail camera placement include considering the type of wildlife being monitored, the terrain, and the camera’s field of view. Animals typically browse at lower heights, so placing the camera too high may result in images showing only the tops of their backs or worse, completely missing them. Additionally, the angle of the camera should be adjusted to ensure that it is aimed at the trail or area of interest, while also avoiding excessive vegetation that could obstruct the view.
Effective trail camera placement significantly impacts wildlife observation and management. Statistics show that using trail cameras can increase the chances of detecting elusive species by 40% compared to traditional methods. This enhanced monitoring capability aids wildlife biologists in gathering vital data on animal populations, movements, and behaviors, which is crucial for conservation efforts and habitat management.
The benefits of placing trail cameras at the recommended height include improved image quality, better identification of species, and increased data collection efficiency. By capturing clear images and videos, researchers and wildlife enthusiasts can gain deeper insights into animal behaviors, migration patterns, and even breeding habits, which are essential for making informed decisions regarding wildlife management.
Best practices for trail camera placement include choosing a sturdy mount, ensuring the camera is securely fastened to prevent theft or damage, and regularly checking the camera to maintain its functionality and battery life. Additionally, using a camouflage cover can help reduce detection by animals and minimize the chances of human interference, leading to more natural and informative wildlife footage.
How Does the Height of a Trail Camera Affect Its Performance?
The height of a trail camera plays a crucial role in its performance, affecting the quality of images and the types of wildlife captured.
- Optimal Height (3 to 5 Feet): This range is often considered the best height for trail cameras as it provides a clear view of the animals while minimizing the chances of capturing too much ground or sky in the frame.
- Height for Large Game (5 to 7 Feet): When targeting larger animals such as deer or elk, setting the camera at a height of 5 to 7 feet can help ensure that the camera captures them in their natural posture, which is often taller than smaller species.
- Height for Small Game (1 to 3 Feet): For smaller animals like rabbits or raccoons, positioning the camera lower to the ground will increase the likelihood of capturing them in their natural behaviors, as they typically remain closer to the ground.
- Angle Adjustment: The angle of the camera can greatly influence the quality of the images. A slight downward angle from a height of around 4 to 6 feet can help capture animals that may be approaching from a distance, providing a better perspective.
- Environmental Considerations: The surrounding environment, such as dense brush or open fields, should also be taken into account. In areas with dense foliage, a higher placement may help avoid obstructions, while open areas may allow for more flexibility in height.
- Security and Visibility: Mounting a camera higher can deter theft and vandalism, as it makes the camera less visible to passersby. However, balance this with the need to capture clear images of wildlife without obstruction.
What Specific Heights Are Ideal for Various Wildlife Species?
The ideal heights for trail cameras can vary depending on the wildlife species you are targeting.
- Deer (3-4 feet): Setting trail cameras at a height of 3 to 4 feet is optimal for capturing deer. This height aligns with their natural line of sight, allowing for clear images while minimizing the chances of the camera being triggered by other ground-level animals.
- Small Mammals (1-2 feet): For small mammals such as raccoons, foxes, or rabbits, a camera height of 1 to 2 feet works best. This placement helps to ensure that the camera captures these animals as they move along the ground, providing clearer images and more accurate behavior observations.
- Birds (5-8 feet): When targeting bird species, particularly those that frequent feeders or specific perches, a height of 5 to 8 feet is recommended. This elevation allows for a wider field of view and helps to capture birds in their natural activity without obstruction.
- Predators (4-6 feet): For larger predators like coyotes or mountain lions, a camera height of 4 to 6 feet is ideal. This height helps to avoid triggering the camera from smaller animals while still being low enough to capture the larger ones as they traverse their territory.
- Elk (4-6 feet): Similar to deer, elk are best observed with cameras set at 4 to 6 feet. This range provides a good angle for photographing these large animals while ensuring the camera’s sensor is at a level where it can effectively capture their movements.
When Should You Consider Adjusting the Height of Your Trail Camera?
Adjusting the height of your trail camera can significantly impact its effectiveness in capturing wildlife activity and ensuring proper framing. Consider the following factors:
- Target Species: Different animals have varying heights, which influences where you should place your camera.
- Type of Environment: The surrounding vegetation and terrain can affect visibility and the angle of capture.
- Time of Year: Seasonal changes can alter animal movement patterns, necessitating adjustments in camera height.
- Camera Specifications: The features of your camera, such as lens type and field of view, can dictate the optimal height for placement.
- Desired Image Composition: The framing of your shots, whether you want full body shots or close-ups, will influence the height at which you set the camera.
Target Species: When determining the best height for your trail camera, consider the species you aim to monitor. For instance, larger animals like deer may require a higher camera placement to capture them effectively, while smaller creatures like raccoons or foxes may be best observed at a lower level.
Type of Environment: The environment where you set your camera plays a significant role in its height. In dense forests, lower placements might be necessary to avoid obstructions like branches, while open fields might allow for higher placements to capture animals from a greater distance.
Time of Year: Seasonal shifts can change how animals behave and where they travel. During breeding seasons or migrations, adjusting the camera height to align with the expected movement patterns of wildlife may yield better results.
Camera Specifications: The capabilities of your camera, such as its field of view and the angle of its lens, should inform your height adjustment. Cameras with a wider field of view may be able to capture more at a lower height, while those with zoom capabilities might need to be placed higher to get clear shots of distant animals.
Desired Image Composition: Think about how you want your images to look. If you’re interested in capturing the full body of animals, you might want to position the camera at a height that matches their shoulder height, whereas for close-ups, a lower placement might be more desirable.
Where Is the Best Location to Set Up Your Trail Camera?
The best height for setting up a trail camera depends on various factors, including the target species and the terrain.
- Chest Height (3-4 feet): This height is ideal for capturing images of deer and other medium-sized animals. It allows for a good field of view and minimizes the chance of the camera being triggered by non-target species like small mammals.
- Ground Level (1-2 feet): Setting a camera at ground level is effective for photographing smaller animals, such as rabbits and rodents. However, this position can lead to more false triggers from vegetation and other ground disturbances.
- Above Eye Level (5-8 feet): Placing a camera higher up can help avoid detection by larger animals and reduce the risk of theft or damage. This height is useful for capturing images of animals moving through trails but may result in less detail in the photos.
- Inclined Position: Angling the camera downward can optimize the field of view, especially on sloped terrain. This setup is particularly useful when targeting specific trails or feeding areas, as it can provide a more comprehensive perspective of animal movements.
- Near Water Sources: Placing cameras at varying heights near water sources can yield great results, particularly for attracting wildlife that comes to drink. Adjusting the height based on the size of the animals in the area can maximize capture rates.
What Mistakes Should You Avoid When Setting the Height of Your Trail Camera?
When setting the height of your trail camera, there are several common mistakes to avoid to ensure optimal performance and image quality.
- Mounting Too High: Many users mistakenly mount their trail cameras too high, which can lead to images of only the tops of animals or no images at all. The best height for trail cameras is typically around 24 to 36 inches off the ground, allowing for a better angle to capture wildlife as they move through their natural environment.
- Incorrect Angle: Setting the camera at the wrong angle can result in missed shots or poor image quality. It’s crucial to point the camera towards the area of interest while ensuring it is level, as a tilted camera can create distorted images or fail to capture movement effectively.
- Ignoring Surroundings: Failing to consider the surrounding foliage and terrain when placing your trail camera can obstruct its view. Before mounting, assess the area for potential obstructions like branches or tall grass that may block the camera’s line of sight, which can diminish its effectiveness.
- Not Testing the Setup: Skipping the testing phase after installation can lead to missed opportunities. Take the time to check the camera’s field of view and capture a few test images to ensure it’s properly positioned and functioning as intended.
- Neglecting to Account for Weather Conditions: Some users overlook how weather can affect the camera’s performance and visibility. Be sure to consider factors like rain, snow, or fog that could obscure the camera or impact its ability to capture clear images, and position it accordingly to reduce exposure to harsh elements.