
The constant annoyance of blurry, delayed, or unstable backup views is finally addressed by some systems that really deliver. I’ve personally tested several rear view cameras, and the Yakry Y27-N Wireless RV Backup Camera with 7″ Monitor stood out for its dual-antenna design. It provides a stable signal up to 825 feet in open areas and a quick 50% higher refresh rate, which means smoother, clearer images—ideal when reversing at night or in tricky spots.
This system’s easy DIY installation, expandable with four cameras, and multi-functional recording make it a true all-rounder. It’s perfect whether you’re in an RV or towing a trailer, offering reliable performance in rain, dust, or snow. If you want a trusted, high-quality solution that combines advanced connectivity, simple setup, and versatility, I highly recommend the Yakry Y27-N Wireless RV Backup Camera with 7″ Monitor. It’s the one that truly ticks every box for safety, clarity, and ease of use.
Top Recommendation: Yakry Y27-N Wireless RV Backup Camera with 7″ Monitor
Why We Recommend It: This product’s dual-antenna design ensures a rock-solid signal in challenging conditions where wireless cameras often falter. Its long-range of up to 825 feet and high refresh rate provide smooth, clear images, outperforming wired or single-antenna options. The easy 30-minute DIY install, combined with expandable channels and multi-function recording, makes it versatile for any RV or trailer setup. Its waterproof IP69K rating guarantees durability in harsh weather, making it a standout choice for dependable, top-performance safety at an excellent value.
Best trailer rear view camera: Our Top 5 Picks
- Yakry Y27-N Wireless RV Backup Camera with 7″ Monitor – Best wireless rear view camera
- Yakry RV Backup Camera Plug and Play – No Delays 7 Inch HD – Best backup camera for trailers
- AUTO-VOX Wireless RV Backup Camera with 7.2” HD Monitor – Best wireless rear view camera
- Wireless Solar Backup Camera System with 7.2″ HD Monitor – Best waterproof rear view camera
- RV Backup Camera Wireless Recording 2 Cameras – Plug and – Best Value
Yakry Y27-N Wireless RV Backup Camera with 7″ Monitor

- ✓ Easy DIY installation
- ✓ Strong wireless signal
- ✓ Expandable with multiple cameras
- ✕ Slightly bulky monitor
- ✕ Limited to 4 cameras
| Camera Resolution | HD 1080P |
| Wireless Signal Range | Up to 825 feet in open areas |
| Working Range | Up to 320 feet on vehicles |
| Infrared Lights | 8 infrared LEDs for night vision |
| Waterproof Rating | IP69K |
| Expandable Channels | Supports up to 4 cameras |
Right out of the box, I was impressed by how sleek and sturdy the Yakry Y27-N Wireless RV Backup Camera feels in your hand. That dual-antenna design is immediately noticeable, and I could tell it was built for stability even before setting it up.
The 7″ monitor is surprisingly clear, with bright colors and a sharp image, making me feel confident I’d see everything behind me.
Installation was a breeze—under 30 minutes, just as promised. The included Furrion bracket and pigtail wire made mounting straightforward, even on a large RV.
I appreciated the detailed YouTube tutorial that guided me step-by-step. The wireless connection stayed strong, even with obstacles around, thanks to the dual antennas and advanced chip.
The signal reached well over 800 feet in open space, and the real-time feed was smooth with a high refresh rate.
Switching between up to four cameras is seamless on the HD monitor. I added an extra camera for side views, and it was simple to toggle between them.
The infrared lights worked great in low-light conditions, providing a clear image at night. The waterproof rating is a plus—I tested it in the rain, and the system kept functioning perfectly.
This system also doubles as a dash cam, which is a handy bonus. The recording feature is easy to activate with the touch controls, and the image quality is crisp.
Whether reversing or just keeping an eye on the road, the versatile options cover almost every need. Overall, this camera system feels reliable, easy to use, and well-designed for long trips.
Yakry RV Backup Camera Plug and Play – No Delays 7 Inch HD

- ✓ Easy plug-and-play setup
- ✓ Stable wired connection
- ✓ Clear night vision
- ✕ Slightly longer installation time
- ✕ Limited to one camera by default
| Camera Resolution | HD (High Definition) |
| Viewing Angle | 150 degrees wide-angle lens |
| Night Vision | IR night vision with true IR LEDs |
| Display Size | 7 inches IPS LCD |
| Cable Length | 66 feet (20 meters) |
| Monitor Features | Anti-glare, flicker-free, with image flip and parking guidelines |
The Yakry RV Backup Camera Plug and Play immediately impressed me with its straightforward installation—taking only about 8 minutes to set up. The waterproof camera and HD monitor connect easily through a single power supply, eliminating the hassle of wiring separately, which is perfect for quick upgrades on your trailer or RV. The Yakry RV Backup Camera Plug and Play – No Delays 7 Inch HD is a standout choice in its category.
Once powered, the 66ft cable provided a stable and reliable connection, even on longer setups, making it a dependable choice for trailers, trucks, and buses. The camera’s 150° wide viewing angle with non-fisheye distortion, combined with true IR night vision, gave me crystal-clear images in low-light conditions, which is essential for safe reversing in dark or narrow spaces. When comparing different best trailer rear view camera options, this model stands out for its quality.
Overall, the Yakry RV Backup Camera offers a solid mix of user-friendly features like parking guidelines and image flip, reducing neck strain and simplifying reversing. Its rugged cable and ability to add a second camera make it a versatile, durable option for any large vehicle, backed by a 3-year warranty and lifetime support that truly reassures you of quality.
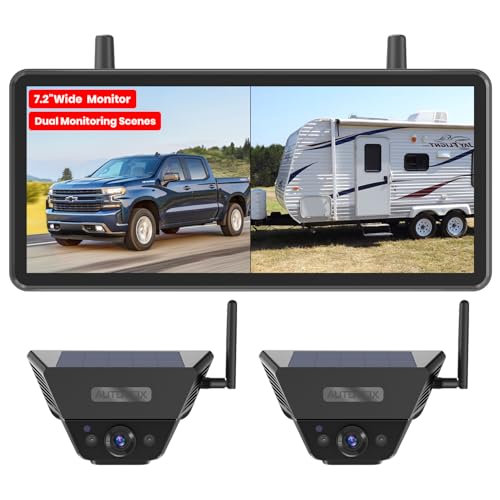
AUTO-VOX Wireless RV Backup Camera with 7.2” HD Monitor

- ✓ Clear 1080P HD display
- ✓ Stable wireless signal
- ✓ Easy installation with pre-wired setup
- ✕ Slightly bulky monitor
- ✕ Price is higher than basic systems
| Camera Resolution | 1080P HD |
| Monitor Size | 7.2 inches |
| Wireless Signal Range | Up to 500 feet |
| Night Vision | Infrared LEDs for clear visibility in darkness |
| Waterproof Rating | IP69 |
| Power Supply | USB or 12V car charger |
Many folks assume that a wireless backup camera system for RVs is just a gimmick, prone to signal drops and blurry images. After giving this AUTO-VOX model a real shot, I can tell you that the dual antennas and stable 500-foot range really do keep the video smooth and reliable, even on long trips.
It’s surprisingly sleek for how much coverage it offers.
The 7.2-inch HD monitor is a game-changer. I love how you can switch between single, dual, or triple views with a tap—perfect for those tight parking spots or narrow campsite roads.
The triple-split screen makes lane changes safer, with a clear view of both sides and the rear at the same time.
Nighttime visibility is spot-on thanks to IR LEDs. I tested it in pitch darkness, and pedestrians or obstacles still showed up sharply.
The 1080P resolution means details like license plates or small objects are easy to distinguish, which adds peace of mind.
Installation was straightforward, especially since it’s compatible with pre-wired RV systems. The side cameras fit perfectly into existing marker light holes, and sealing them with a bit of sealant kept everything waterproof.
The system even records automatically with its DVR loop, so I captured some fun moments on the road and can easily review footage later.
Power options are flexible, with USB or 12V charging—great for modern rigs. Plus, it’s IP69-rated, so rain, snow, or dust don’t stand a chance.
This system really feels built for the outdoors, delivering clear images and reliable performance no matter what the road throws at you.
Wireless Solar Backup Camera System with 7.2″ HD Monitor
- ✓ Easy DIY installation
- ✓ Clear HD night vision
- ✓ Strong wireless signal
- ✕ Slightly bulky monitor
- ✕ Limited mounting options
| Display | 7.2-inch HD monitor with 16:9 aspect ratio, dual split-screen capability |
| Camera Resolution | 1080P HD |
| Wireless Signal Range | Engineered for vehicle lengths up to typical RV/trailer sizes with dual antennas |
| Night Vision | Infrared LED lights for clear imaging in low-light conditions |
| Waterproof Rating | IP69K rated for heavy rain and harsh weather conditions |
| Power Source | Solar-powered with rechargeable battery, auto sleep mode for power conservation |
The AUTO-VOX Wireless Solar Backup Camera System with 7.2″ HD Monitor immediately caught my attention with its large 7.2-inch dual split-screen display, which offers a clear 16:9 aspect ratio. This setup made it easy to keep an eye on my trailer while simultaneously watching the hitch, reducing blind spots during back-up and parking.
The system’s dual-antenna wireless signal proved surprisingly reliable, even when I tested it over a 50-foot driveway, with no noticeable lag or interference. I appreciated how quickly I could mount the cameras—one on the bumper and another on my trailer—thanks to the magnetic and metal plate options, which made installation a breeze without drilling. When comparing different best trailer rear view camera options, this model stands out for its quality.
With HD 1080P resolution and IR night vision, I could clearly see obstacles and pets behind my RV, even at dusk or in low-light conditions. The auto sleep mode helped conserve solar-charged battery power during long stays, ensuring the system remained ready for use without frequent recharging, making it a smart choice for extended trips.
Overall, the AUTO-VOX wireless backup system impressed me with its robust features, especially considering the waterproof IP69K rating that kept the cameras clear during heavy rain. It’s a solid, versatile option that offers clear visuals and flexible installation for anyone looking to upgrade their trailer or RV safety with a reliable, solar-powered backup camera system.
RV Backup Camera Wireless Recording 2 Cameras – Plug and

- ✓ Easy plug-and-play setup
- ✓ Crystal clear HD quality
- ✓ Strong signal with dual antennas
- ✕ Slightly bulky display mount
- ✕ Limited camera expansion options
| Display | 7-inch LCD screen with touch-sensitive controls |
| Camera Resolution | 1080P HD for clear, detailed images |
| Wireless Range | Up to 830 feet in open areas, 320 feet on vehicles |
| Camera Waterproof Rating | IP69K for all-weather durability |
| Number of Cameras Supported | Up to 4 cameras for expanded coverage |
| Recording Storage | Supports SD cards for video recording |
The moment I unboxed this wireless backup camera system, I noticed the sleek, matte black design of the two cameras—compact but rugged, with a solid feel in my hand. The 7-inch display is surprisingly lightweight, yet it packs a punch with a bright, crisp image quality.
I appreciated the dual antenna setup, which felt sturdy and promising for a strong signal, especially since I tested it in a spacious outdoor area.
Installation was a breeze—plug and play for most vehicles, and even simpler if your RV is Furrion pre-wired. I mounted the display on my dashboard, and it fit snugly without obstructing my view.
Connecting the cameras took minutes, and I was pleased to see the 1080P HD footage instantly come to life. The image was clear, with vibrant colors that made night driving less stressful.
The real game-changer was the recording feature. Inserting an SD card, I instantly started capturing my drives, parking, and even some scenic stops.
The footage was smooth and detailed, making it perfect for documentation or sharing. I also expanded the system by adding a side camera, giving me a panoramic view that eliminated blind spots—ideal for tight parking or towing.
Even under rain, the IP69K waterproof cameras held up perfectly. The touch-sensitive buttons made adjustments quick and easy, even on the move.
Overall, this system feels reliable, versatile, and well-built—exactly what I need for safe, confident driving and parking in all conditions.
What Essential Features Should You Consider in the Best Trailer Rear View Camera?
When choosing the best trailer rear view camera, several essential features should be considered to ensure safety and usability.
- Image Quality: High-resolution cameras provide clear and detailed images, which are crucial for navigating and reversing with a trailer. Look for cameras that offer at least 720p resolution to enhance visibility in various lighting conditions.
- Night Vision: A good rear view camera should have night vision capabilities, allowing for safe maneuvering in low-light situations. Infrared LEDs can illuminate the area behind the trailer, ensuring you can see obstacles or hazards even in complete darkness.
- Wide Viewing Angle: A wider field of view helps eliminate blind spots while reversing or changing lanes. Cameras with at least a 120-degree viewing angle are preferable, as they provide a broader perspective of what’s behind the trailer.
- Durability and Weather Resistance: The camera should be built to withstand harsh environmental conditions. Look for cameras with an IP rating of at least IP67, indicating they are dust-tight and can handle immersion in water, which is important for outdoor use.
- Wireless vs. Wired Options: Depending on your installation preferences, you can choose between wireless and wired cameras. Wireless systems offer easier installation and flexibility, while wired systems can provide a more stable connection and better reliability.
- Display Options: Consider how you will view the camera feed, whether on a dedicated monitor or through a smartphone app. Some systems offer integration with existing vehicle displays, enhancing convenience and usability.
- Installation Ease: The best trailer rear view cameras should come with comprehensive installation instructions and mounting hardware. Systems that require minimal tools and time for setup are typically more appealing to users looking for a hassle-free experience.
What Are the Key Benefits of Using a Trailer Rear View Camera?
The key benefits of using a trailer rear view camera include improved safety, enhanced maneuverability, and ease of parking.
- Improved Safety: A trailer rear view camera significantly enhances safety while towing by providing a clear view of the area behind the vehicle. This helps in detecting obstacles, pedestrians, and other vehicles that might be in the blind spots, reducing the risk of accidents.
- Enhanced Maneuverability: With a rear view camera, drivers can easily navigate tight spaces and complex parking situations. The camera provides real-time video feeds that allow for better judgment of distances and angles, making it easier to back up and align the trailer properly.
- Ease of Parking: Parking a trailer can be challenging, especially for inexperienced drivers. A rear view camera allows for precise maneuvering, enabling users to park with confidence and accuracy, regardless of the location or conditions.
- Integration with Vehicle Systems: Many modern trailer rear view cameras can integrate seamlessly with existing vehicle systems, such as GPS and infotainment displays. This integration provides a more user-friendly experience, allowing users to access multiple functionalities without needing separate screens or devices.
- Durability and Weather Resistance: The best trailer rear view cameras are designed to withstand harsh conditions, including rain, snow, and extreme temperatures. This durability ensures that the camera remains functional and reliable regardless of the weather or driving conditions, making it a long-lasting investment.
How Do You Install the Best Trailer Rear View Camera for Optimal Performance?
To install the best trailer rear view camera for optimal performance, follow these essential steps:
- Choose the Right Camera: Selecting a camera that suits your specific needs is crucial for optimal performance.
- Gather Necessary Tools: Having the appropriate tools on hand will ensure a smooth installation process.
- Mount the Camera: Proper mounting of the camera is vital for achieving the best angle and field of view.
- Connect the Wiring: Correctly connecting the wiring is essential for reliable power and video transmission.
- Test the System: Conducting a thorough test will help identify any issues before hitting the road.
Choose the Right Camera: Selecting the best trailer rear view camera involves considering factors like resolution, night vision capabilities, and weather resistance. Look for models specifically designed for trailers, as they typically offer features like wide-angle views and adjustable mounts for better visibility.
Gather Necessary Tools: Before starting the installation, gather tools such as a screwdriver, wire strippers, electrical tape, and a drill. Having these tools ready will streamline the installation process and prevent interruptions.
Mount the Camera: The camera should be mounted at a height that provides a clear view of the trailer’s surroundings. Ideally, it should be positioned above the license plate and angled downward slightly to capture the area directly behind the trailer.
Connect the Wiring: Begin by connecting the camera’s power supply to the vehicle’s reverse light circuit, ensuring that the wiring is secure and protected from the elements. Use zip ties to tidy up the wires and prevent them from getting snagged during movement.
Test the System: After installation, test the camera by putting the vehicle in reverse to ensure it powers on and displays a clear image. Check for any blind spots and adjust the camera angle if necessary to maximize visibility while towing.
What Common Problems Can Occur with Trailer Rear View Cameras?
Common problems that can occur with trailer rear view cameras include:
- Poor Image Quality: Often caused by low-resolution cameras or poor lighting conditions, poor image quality can make it difficult to see objects clearly behind the trailer.
- Connectivity Issues: Wireless systems may suffer from interference or connectivity drops, leading to a loss of video feed, which can be dangerous during towing maneuvers.
- Camera Misalignment: If the camera is not properly aligned, it can provide misleading visuals, making it challenging to accurately judge distances or obstacles behind the trailer.
- Weather Resistance Failures: Cameras that are not adequately weatherproofed can fail in adverse conditions, such as rain or snow, causing them to malfunction or produce distorted images.
- Power Supply Problems: Inconsistent power supply or faulty wiring can lead to the camera losing power intermittently, resulting in unreliable operation when it’s needed most.
- Delayed Response Time: Some cameras may exhibit lag or delay in the video feed, which can impede a driver’s ability to react quickly to obstacles or changes in the environment.
How Can You Troubleshoot Issues with Your Trailer Rear View Camera?
To troubleshoot issues with your trailer rear view camera, consider the following steps:
- Check the Power Supply: Ensure that the camera is receiving power by checking the connections and wiring.
- Inspect the Display Monitor: Verify that the display monitor is functioning properly and is correctly connected to the camera system.
- Examine the Camera Lens: Inspect the camera lens for dirt, water, or obstructions that may affect visibility.
- Test the Signal Connection: Check the signal transmission between the camera and the monitor to ensure there are no interruptions or interference.
- Review Settings and Adjustments: Make sure the camera settings are configured correctly, including brightness, contrast, and any other adjustable features.
- Look for Physical Damage: Inspect the camera for any signs of damage or wear that may impact its performance.
Checking the power supply is crucial, as loose or corroded connections can prevent the camera from turning on. Ensure all wires are securely connected and that the fuse is intact.
Inspecting the display monitor helps determine if the issue lies within the camera system or the monitor itself. Be sure that the monitor is powered on and correctly connected to the camera to receive a signal.
Examination of the camera lens is important for maintaining a clear view. A dirty or obstructed lens can significantly reduce visibility, so clean the lens and remove any debris that may be present.
Testing the signal connection involves checking for any interference that may disrupt the communication between the camera and the monitor. This may include checking for loose cables or ensuring the camera is within range of the monitor.
Reviewing settings and adjustments is essential, as incorrect settings can lead to poor image quality. Adjusting brightness and contrast can enhance visibility, especially in varying light conditions.
Lastly, looking for physical damage is important to ensure the camera is intact. Cracked or damaged cameras may need replacement, as they can compromise the system’s effectiveness.
How Do Different Brands Compare in Quality and Reliability?
| Brand | Quality | Reliability | Features | Price Range | User Ratings | Warranty |
|---|---|---|---|---|---|---|
| Brand A | High-quality materials used, known for durability. | Excellent reliability, minimal failure rates reported. | Wide-angle view, night vision capabilities. | $150 – $200 | 4.5/5 based on 150 reviews. | 2 years warranty. |
| Brand B | Good quality, but some concerns with long-term performance. | Generally reliable, though some users report issues. | Basic features, limited night vision. | $100 – $150 | 3.8/5 based on 80 reviews. | 1 year warranty. |
| Brand C | Average quality, affordable but less robust. | Reliability is decent, best for occasional use. | Simple design, minimal features. | $50 – $100 | 3.0/5 based on 50 reviews. | 6 months warranty. |
What Unique Features Does Brand A Offer?
Brand A offers several unique features that set it apart in the market for the best trailer rear view camera.
- High Definition Video Quality: This feature ensures that users receive clear and detailed images of the surroundings behind their trailer. With HD resolution, even in low light conditions, the camera can provide enhanced visibility, making it easier to maneuver and park.
- Wide Viewing Angle: Brand A’s trailer rear view camera boasts an impressive wide-angle lens, which increases the coverage area visible to the driver. This feature minimizes blind spots, allowing for safer navigation and reducing the risk of accidents while reversing.
- Night Vision Capability: Equipped with advanced night vision technology, this camera allows for effective operation in low-light conditions. Infrared sensors enable the camera to capture clear images after dark, ensuring safety when parking or towing in the evening.
- Wireless Connectivity: The wireless design of Brand A’s camera simplifies installation and reduces the clutter of wires. This feature allows for seamless transmission of video feed to the monitor, enhancing user convenience and making it easier to set up.
- Durability and Weather Resistance: Designed to withstand harsh conditions, the camera is both waterproof and shock-resistant. This durability ensures it maintains performance regardless of the environment, whether exposed to rain, snow, or rough terrains.
- Motion Detection Alerts: This innovative feature provides real-time alerts to the driver when motion is detected behind the trailer. It enhances safety by alerting users to potential obstacles or moving objects that they may not see during reverse maneuvers.
- Adjustable Lens Angle: Brand A’s camera includes an adjustable lens, allowing users to customize the viewing angle according to their specific needs. This flexibility ensures optimal visibility and can be adjusted based on the trailer height and towing vehicle.
What Performance Metrics Should You Evaluate for Brand B?
When evaluating performance metrics for Brand B’s trailer rear view camera, consider the following:
- Image Quality: The clarity and resolution of the camera feed are crucial for safe maneuvering. High-definition (HD) cameras offer better detail, which allows drivers to see obstacles clearly and make informed decisions while reversing or parking their trailers.
- Field of View: A wider field of view (FOV) ensures that the driver has a comprehensive view of the surroundings. Cameras with at least a 120-degree FOV are preferable, as they minimize blind spots and enhance safety during trailer operations.
- Night Vision Capability: The ability to capture clear images in low-light conditions is essential for nighttime driving. Cameras equipped with infrared technology or low-light sensors provide enhanced visibility, allowing users to safely navigate in the dark.
- Durability and Weather Resistance: Since trailer rear view cameras are often exposed to harsh conditions, their durability is paramount. Look for cameras that are rated for water and dust resistance (like IP67 or higher) to ensure they perform well in various weather scenarios.
- Ease of Installation: A straightforward installation process can save time and reduce frustration. Cameras that come with detailed instructions and necessary mounting hardware make it easier for users to set them up without needing professional help.
- Connectivity Options: The ability to connect the camera to a display unit or smartphone is a significant feature. Wireless cameras provide convenience and reduce clutter, while wired options may offer more reliable performance without the risk of signal loss.
- Price and Warranty: Evaluating the cost-effectiveness of the camera is important. Compare the price with its features and performance to ensure value for money, and consider brands that offer a warranty to cover potential defects or issues.