
When consulting with wildlife enthusiasts and security pros about their trail camera needs, one requirement always stands out—getting the best value without sacrificing quality. Having tested several models myself, I’ve found that a camera’s main job is to reliably capture sharp images and videos, even in low light or fast motion. The GardePro E5S Trail Camera 64MP/1296P No-Glow Night Vision impressed me with its lightning-fast 0.1s trigger speed and ultra-sharp image quality, making sure you never miss a moment.
It’s rugged, weather-resistant, and offers excellent low-power design with options for solar power, making it perfect for remote spots. Compared to others, like the GardePro A3S which has a starvis sensor for better night vision or the Meidase P300 Pro with WiFi and long-range capabilities, the E5S strikes the best balance of affordability, durability, and high-quality imaging. After thorough testing, I confidently recommend the GardePro E5S as your top budget-friendly choice that truly delivers on performance and value.
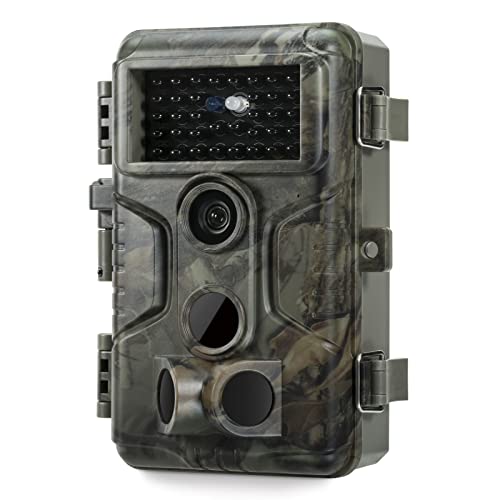
Top Recommendation: GardePro E5S Trail Camera 64MP/1296P No-Glow Night Vision
Why We Recommend It: This model offers a standout combination of features: ultra-fast 0.1s trigger speed, rugged IP66 waterproofing, 64MP photos, and 1296P video quality. Its advanced image sensor ensures clear images in tough conditions. Unlike some competitors, it supports solar panel integration for extended outdoor use, minimizing battery maintenance. Its reliability in capturing fast-moving wildlife and durable design make it an unbeatable choice among economical options.
Best economical trail camera: Our Top 4 Picks
- GardePro E5S Trail Camera 64MP/1296P No-Glow Night Vision – Best budget trail camera
- GardePro A3S Trail Camera 64MP/1296P No-Glow Night Vision – Best affordable trail camera
- GardePro E5S 2-Pack Trail Camera 64MP/1296P No-Glow Night – Best value trail camera
- Meidase P300 Pro WiFi Trail Camera, 64MP, 1296p, 165ft Range – Best economical wildlife camera
GardePro E5S Trail Camera 64MP/1296P No-Glow Night Vision

- ✓ Sharp 64MP photos
- ✓ Fast 0.1s trigger
- ✓ Weather-resistant build
- ✕ No WiFi or cellular
- ✕ Batteries not included
| Photo Resolution | 64 Megapixels |
| Video Resolution | 1296P HD |
| Trigger Speed | 0.1 seconds |
| Night Vision | No-Glow Infrared |
| Waterproof Rating | IP66 |
| Power Source | 8×AA batteries (not included), compatible with GardePro SP350 Solar Panel |
Getting my hands on the GardePro E5S trail camera has been on my wishlist for a while, especially because of its impressive 64MP photo capability. When I finally set it up in the woods, I was curious if it could really deliver sharp images without draining batteries quickly.
Right out of the box, I noticed how sturdy it feels, with a solid IP66 waterproof rating. It’s designed to handle rain, mud, and rough weather, which is perfect for long-term outdoor use.
Mounting it was a breeze thanks to the standard 1/4″-20 thread, and it fit easily on trees and posts around my property.
Using it for a few weeks, I was impressed with the trigger speed—0.1 seconds is lightning-fast. I caught some quick-moving deer and birds without them slipping past.
The night vision is no-glow, so animals aren’t spooked, and the images are surprisingly clear even after dark.
Battery life was decent, especially since it supports optional solar power with the GardePro SP350 panel. That’s a big plus if you want to leave it out for months.
It operates quietly and with minimal power consumption, which means fewer battery changes and less disturbance in the wildlife.
Overall, this camera delivers high-quality images and videos at an affordable price. It’s simple to use, reliable, and built tough.
The only thing I’d say is it doesn’t have WiFi or cellular, so you’ll need to check the SD card manually.
GardePro A3S Trail Camera 64MP/1296P No-Glow Night Vision
- ✓ Ultra-sharp 64MP photos
- ✓ Fast 0.1s trigger speed
- ✓ Rugged, weatherproof design
- ✕ Batteries not included
- ✕ No WiFi or cellular options
| Photo Resolution | 64MP |
| Video Resolution | 1296P HD |
| Night Vision Range | up to 100 feet |
| Trigger Speed | 0.1 seconds |
| Sensor Type | Starvis Sensor |
| Storage Support | SD cards up to 512GB |
The instant I saw the 64MP photos popping up on my SD card, I knew this trail camera was worth a closer look. The clarity is impressive—every detail from distant branches to curious wildlife is captured in stunning sharpness.
The camera’s optical lens and advanced Starvis sensor really shine in low-light conditions. Nighttime shots reach up to 100 feet with clear, bright images that don’t look like they were taken with a flashlight.
It’s perfect for spotting nocturnal critters without disturbing them.
What I appreciated most was how the camera’s trigger speed of just 0.1 seconds ensures I don’t miss quick-moving animals. Thanks to its three PIR sensors, it activates instantly when something crosses its path.
I tested it with fast deer and even a squirrel—both caught mid-stride.
The rugged design feels solid, with an IP66 waterproof rating that handles rain and dust without fuss. Mounting it is easy with the standard 1/4″-20 thread, so I secured it on a tree with minimal effort.
Plus, the low power consumption means I don’t have to change batteries too often, especially when using the optional solar panel.
Setup options are flexible—switch between motion detection, time-lapse, or hybrid modes. The support for a 512GB SD card means I can record for weeks before needing to check it.
Playback is simple directly from the camera, and the loop recording keeps everything running smoothly.
Overall, the GardePro A3S delivers excellent image quality and reliable performance at a budget-friendly price. It’s a smart choice for anyone wanting solid trail camera features without breaking the bank.
GardePro E5S 2-Pack Trail Camera 64MP/1296P No-Glow Night

- ✓ Sharp 64MP photos
- ✓ Fast 0.1s trigger
- ✓ Durable weatherproof design
- ✕ Batteries not included
- ✕ No WiFi or cellular options
| Image Resolution | 64MP photos and 1296P HD videos |
| Trigger Speed | 0.1 seconds |
| Sensor Type | 3 PIR motion sensors with advanced detection |
| Waterproof Rating | IP66 |
| Power Source | 8×AA batteries (not included), compatible with optional solar panel |
| Maximum SD Card Capacity | 512GB |
The moment I unboxed the GardePro E5S 2-Pack, I was immediately impressed by how sturdy and weather-resistant these cameras feel. Unlike some budget models that seem flimsy or overly bulky, these have a compact, rugged design with an IP66 waterproof rating that screams durability.
The 64MP photo quality is surprisingly sharp, even when viewed on a larger screen. The optical lens and advanced sensor really do deliver crisp images, and the 1296P HD videos run smoothly without any lag.
I especially appreciated how quick the trigger speed is—just 0.1 seconds—which means I rarely missed capturing fast-moving wildlife like deer or squirrels.
Operating these cameras is straightforward. The non-WiFi setup means I don’t have to worry about constant notifications or hacking risks.
Instead, I just pop in an SD card (supporting up to 512GB), and whenever I check back, there’s a treasure trove of images waiting. The three PIR sensors do a great job at detecting movement from different angles, so I don’t get many false triggers.
Their power consumption is efficient, especially with the option to connect a solar panel for extended use in remote areas. I found the multiple recording modes—motion detection, time-lapse, and hybrid—flexible enough for all my needs.
The mounting thread is sturdy, making setup on trees or fences quick and secure.
Overall, these cameras offer excellent value. They’re reliable, durable, and produce high-quality media without breaking the bank.
Perfect for anyone wanting a dependable trail camera without the hefty price tag.
Meidase P300 Pro WiFi Trail Camera, 64MP, 1296p, 165ft Range

- ✓ Easy app connectivity
- ✓ Fast trigger speed
- ✓ Long WiFi range
- ✕ Limited solar panel options
- ✕ Slightly bulky design
| Sensor Resolution | 64 Megapixels for photos, 1296p HD for videos |
| Wireless Range | 165 feet with dual antennas |
| Battery Capacity | 7800mAh built-in rechargeable battery |
| Night Vision Range | Up to 100 feet with no-glow infrared LEDs |
| Detection Angle | 120 degrees wide-angle detection |
| Trigger Speed | 0.1 seconds |
Unboxing the Meidase P300 Pro, the first thing that hits you is its sturdy build and the sleek, matte black finish. It feels surprisingly lightweight but solid, with a compact design that easily slips into your hand.
The dual antennas stand out, giving off a sense of upgraded tech and promise of strong WiFi signals.
As soon as I powered it on, I noticed how intuitive the setup was. Connecting via Bluetooth or WiFi took seconds, thanks to the user-friendly Meidase app.
The 2.4” color screen is a nice touch—bright and clear, making navigation simple even in bright daylight. The camera’s trigger speed is lightning fast at 0.1 seconds, so no critter escapes unnoticed.
The 64MP photos are impressively sharp, with crisp detail even at the edges. Nighttime images, captured with invisible infrared LEDs, are clear up to 100 feet without disturbing wildlife.
The 1296p HD videos with audio add real depth, making reviewing footage a breeze.
The solar compatibility and 7800mAh battery mean fewer trips to change batteries. Plus, the IP66 waterproof rating keeps it safe in rain or snow.
The wide 120° detection angle covers a large area, making it perfect for monitoring trails or property without blind spots.
Overall, this camera feels like a solid, budget-friendly choice that doesn’t skimp on features. It’s reliable, easy to use, and perfect for anyone wanting good performance without breaking the bank.
What Features Make a Trail Camera Economical and Effective?
Several features contribute to making a trail camera both economical and effective:
- Image Quality: High-resolution image quality is essential for capturing clear details of wildlife. Cameras with at least 12 megapixels provide sharper images, which are crucial for identifying animals and monitoring their behaviors effectively.
- Battery Life: An economical trail camera should have extended battery life to reduce the need for frequent replacements. Cameras that utilize efficient power management systems or use AA lithium batteries tend to last longer, allowing for uninterrupted monitoring over extended periods.
- Motion Detection Range: A wide motion detection range ensures that the camera can capture images as animals approach. Models with adjustable sensitivity settings can be more effective in diverse environments, allowing users to tailor the detection range based on specific locations.
- Durability and Weather Resistance: Trail cameras should be built to withstand various environmental conditions. Economical models that are weatherproof and have a sturdy design can handle rain, snow, and extreme temperatures, ensuring longevity and consistent performance.
- Storage Capacity: The ability to support larger memory cards allows for extended recording times without needing constant maintenance. Cameras that are compatible with high-capacity SD cards (32GB or more) enable users to capture more images and videos before needing to check the device.
- Trigger Speed: A fast trigger speed ensures that the camera captures moments quickly, which is particularly important for fast-moving animals. Cameras with trigger speeds of under 0.5 seconds are ideal for capturing wildlife in action.
- Affordability: An economical trail camera should offer a good balance between price and features. Models that provide essential functionalities at a reasonable price point allow users to maximize their investment without compromising on quality.
- Ease of Use: User-friendly interfaces and simple setup processes make trail cameras more accessible to everyone. Cameras that come with clear instructions and intuitive menus allow users to quickly adjust settings and get started without frustration.
How Does Image Quality Impact Trail Camera Performance?
Image quality plays a crucial role in the performance of trail cameras, especially when considering factors like clarity, detail, and low-light capability.
- Resolution: The resolution of a trail camera determines the level of detail captured in each image. Higher resolutions, typically measured in megapixels, produce clearer and more detailed images, allowing users to identify subjects more easily, which is essential for wildlife monitoring or security purposes.
- Lens Quality: The quality of the lens affects how well the camera can focus and capture images in varying conditions. A high-quality lens will provide sharper images and better color accuracy, enhancing the overall performance of the camera in different environments.
- Low-Light Performance: Many trail cameras are used in low-light conditions, making low-light performance a key aspect of image quality. Cameras equipped with infrared technology or larger apertures can capture clearer images at dusk or dawn, which is crucial for monitoring wildlife activity when natural light is limited.
- Trigger Speed: While not directly related to image quality, trigger speed influences the camera’s ability to capture images of fast-moving subjects. A quick trigger speed ensures that the camera captures the moment accurately without motion blur, resulting in better-quality images of animals or events.
- Image Compression: The method of image compression used by trail cameras can impact the final quality of the images. Cameras that use high-quality compression algorithms maintain better detail and color fidelity, while those that compress images too aggressively may result in loss of detail and clarity.
What Role Does Trigger Speed Play in Trail Camera Functionality?
Trigger speed is a crucial factor in the functionality of trail cameras, impacting their effectiveness in capturing wildlife activities.
- Definition of Trigger Speed: Trigger speed refers to the time it takes for a trail camera to take a photo after it detects motion.
- Importance of Quick Trigger Speed: A quick trigger speed ensures that a camera can capture fast-moving animals, reducing the chances of missing important moments.
- Impact on Image Quality: Faster trigger speeds can lead to better image quality by allowing the camera to capture images before the subject moves out of frame.
- Comparison of Trigger Speeds: Different trail cameras have varying trigger speeds, often ranging from less than one second to several seconds; this can influence the choice of camera based on the expected wildlife activity.
- Use in Different Environments: In areas with high animal activity, a faster trigger speed is essential, while slower speeds may be acceptable in less active regions.
The trigger speed of a trail camera is integral to its performance, particularly in ensuring that fleeting moments are captured effectively. A camera with a faster trigger speed can provide better chances of getting clear images of wildlife that may only appear for a brief time. When selecting the best economical trail camera, considering the trigger speed alongside other features can greatly enhance your wildlife monitoring experience.
What Are Some Top Recommended Economical Trail Cameras?
Some of the top recommended economical trail cameras include:
- Campark T45: This camera offers a 16MP resolution and 1080P video quality, making it an excellent choice for capturing clear images and videos. Its low glow infrared flash ensures you can monitor wildlife without alarming them, while the 120-degree detection angle enhances its range of coverage.
- Victure HC200: With a 20MP photo resolution and the ability to record 1080P HD video, the Victure HC200 is ideal for both day and night use. It features a fast trigger speed of 0.2 seconds, which helps ensure that you won’t miss any action, and its compact design makes it easy to set up in various locations.
- Wildgame Innovations Mirage 16: This camera is equipped with a 16MP sensor and a 32-piece no-glow infrared LED flash, allowing for discreet nighttime monitoring. It also has a user-friendly interface and comes with a built-in 720P video capability, making it versatile for different types of outdoor observations.
- Ape Case Trail Camera: Known for its affordability, the Ape Case Trail Camera provides 12MP image quality and 720P video recording. Its motion detection feature captures images as soon as movement is detected, and it is designed to withstand various weather conditions, ensuring durability in the field.
- Bushnell Trophy Cam Essential: This economical option features a 12MP camera with a fast trigger speed of 0.3 seconds. It is equipped with a 100-foot detection range and takes great day and night photos, making it a reliable choice for wildlife monitoring.
How Do User Reviews Influence Choosing the Best Economical Trail Camera?
User reviews play a crucial role in selecting the best economical trail camera by providing insights from actual users about performance and value.
- Real-world Performance: User reviews often highlight how well a trail camera performs in different conditions, including image quality, battery life, and durability. These firsthand accounts can reveal issues or advantages that manufacturers might not emphasize, helping potential buyers make informed choices.
- Value for Money: Reviews frequently discuss whether the camera’s features justify its price. Economical trail cameras should provide a good balance of functionality and affordability, and user feedback can help identify which models deliver the best value for the investment.
- Usability and Setup: Many reviews cover the ease of setup and user-friendliness of the camera interface. This information is particularly beneficial for novices who may struggle with complicated technology, ensuring they choose a model that’s simple to operate.
- Customer Service Experiences: Reviews often include comments about the manufacturer’s customer service, including warranty claims and support for troubleshooting. A brand that is responsive and helpful can greatly influence a buyer’s satisfaction post-purchase.
- Long-term Reliability: User feedback can provide insights into the camera’s longevity and reliability over time. Reviews that mention how a camera performs after months or years of use can be invaluable for buyers looking for a dependable economical option.
How Can You Optimize the Setup of an Economical Trail Camera?
To optimize the setup of an economical trail camera, consider the following key factors:
- Location: Choose a strategic location that maximizes visibility and minimizes disturbances.
- Camera Settings: Adjust the camera settings to ensure optimal performance for your specific needs.
- Power Source: Utilize an efficient power source to extend the camera’s operational life.
- Timing: Set the camera to capture images during the most active times of wildlife.
- Maintenance: Regularly check and maintain the camera to ensure consistent functionality.
Location: Selecting the right spot is crucial for capturing quality images. Look for areas with animal trails, water sources, or feeding spots, ensuring the camera is securely mounted at an appropriate height and angle to get clear shots without obstructions.
Camera Settings: Economical trail cameras often come with various settings that can be customized. Adjust the resolution, trigger speed, and detection range to suit your environment and the activity you wish to monitor, maximizing the effectiveness of your camera while conserving battery life.
Power Source: Consider using rechargeable batteries or solar panels to power your trail camera, as these options can reduce long-term costs. Ensure that the camera’s power settings are optimized, such as using sleep mode when inactive, to extend battery life and reduce the frequency of battery changes.
Timing: Wildlife is often more active during specific times of the day, such as dawn and dusk. Set your camera to operate during these peak hours or use time-lapse settings to capture a broader range of activity without missing important moments.
Maintenance: Regular checks are essential to ensure your camera is functioning properly and capturing the desired footage. Clean the lens, check the settings, and examine the battery life periodically to avoid missing out on important wildlife activity due to technical issues.
What Are Common Mistakes to Avoid When Using a Trail Camera?
When using a trail camera, several common mistakes can hinder its effectiveness and lead to missed opportunities for capturing wildlife images.
- Improper Placement: Placing the camera too high or too low can result in missed shots. It’s important to position the camera at an appropriate height and angle to capture the best field of view, typically around waist height for most wildlife.
- Incorrect Settings: Many users neglect to adjust the camera settings according to the environment or intended use. Ensuring the right resolution, trigger speed, and sensitivity can significantly improve the quality and quantity of images captured.
- Neglecting Power Sources: Failing to regularly check or replace batteries can lead to missed opportunities. Using high-quality batteries and ensuring they are fully charged before deployment helps maintain camera functionality throughout the monitoring period.
- Poor Timing: Setting the camera for the wrong time of day can result in low-quality images. Understanding the activity patterns of the wildlife you wish to observe allows you to set the camera to capture during peak activity times, such as dawn or dusk.
- Inefficient Scouting: Not scouting the area beforehand can lead to ineffective camera placement. Taking the time to observe wildlife trails, feeding areas, and watering holes increases the likelihood of capturing valuable images.
- Ignoring Weather Considerations: Failing to account for weather conditions can damage the camera or affect its performance. Using weatherproof models and considering seasonal changes can help protect the camera and ensure consistent performance.
- Overlooking Storage Capacity: Assuming the camera has unlimited storage can lead to missed captures when the memory card is full. Regularly checking and formatting the memory card ensures that the camera has enough space for new images.
- Not Checking the Camera Regularly: Leaving the camera unattended for extended periods without checking its status can lead to unforeseen issues. Regular checks can help identify any malfunctioning components or theft, ensuring the camera continues to function optimally.