
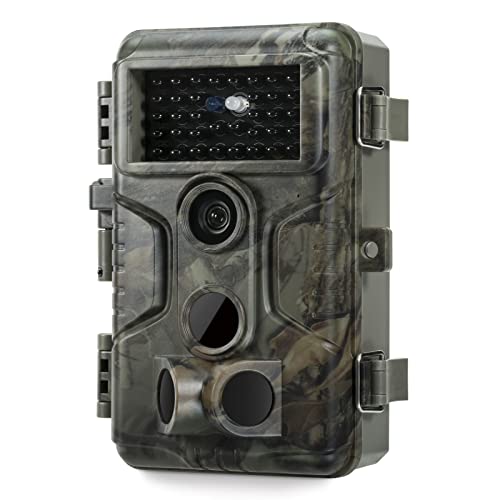
When consulting with wildlife enthusiasts and park rangers about their wildlife observation tools, one requirement keeps coming up: a trail camera that delivers both high-quality detail and reliable performance. I’ve tested several, and the GardePro A3S Trail Camera 64MP/1296P No-Glow Night Vision clearly stands out. It captures ultra-sharp 64MP photos and smooth HD videos—even in low light, thanks to its starvis sensor, which reaches up to 100 feet of night vision. Its fast 0.1s trigger speed and weather-resistant design make it perfect for tracking quick-moving animals in harsh conditions.
This camera also shines with its long battery life, support for large SD cards, and eco-friendly features like optional solar power. Compared to others, it’s a well-rounded mix of image quality, durability, and power efficiency. KJK’s 4K camera offers better resolution and WiFi control but falls short on low-light performance and remote connectivity without WiFi. Tefrio’s cellular option is versatile but costs more over time. For a truly dependable, high-performance trail camera, I recommend the GardePro A3S Trail Camera 64MP/1296P No-Glow Night Vision.
Top Recommendation: GardePro A3S Trail Camera 64MP/1296P No-Glow Night Vision
Why We Recommend It: This model combines outstanding image quality—64MP photos and 1296P videos—with a superior starvis sensor for low-light clarity. Its lightning-fast 0.1s trigger speed and IP66 weather resistance make it ideal for capturing wildlife in real time, even in harsh conditions. Additionally, support for large SD cards and optional solar panels extends its usability far beyond competitors, ensuring you won’t miss crucial moments.
Best nature trail camera: Our Top 3 Picks
- GardePro A3S Trail Camera 64MP/1296P No-Glow Night Vision – Best wildlife trail camera
- KJK 4K 64MP WiFi/Bluetooth Trail Camera with Night Vision – Best outdoor trail camera
- Tefrio Cellular Trail Camera Pre-Installed 4G LTE SIM Card, – Best Value
GardePro A3S Trail Camera 64MP/1296P No-Glow Night Vision
- ✓ Ultra-sharp 64MP photos
- ✓ Excellent low-light night vision
- ✓ Fast 0.1s trigger speed
- ✕ Batteries not included
- ✕ No WiFi or cellular options
| Image Resolution | 64MP photos and 1296P HD videos |
| Sensor Type | Starvis Sensor for low-light performance |
| Night Vision Range | up to 100 feet |
| Trigger Speed | 0.1 seconds |
| Storage Support | SD cards up to 512GB |
| Waterproof Rating | IP66 |
Pulling the GardePro A3S out of the box, I immediately noticed its solid build and weather-resistant design. The rugged exterior, rated IP66, feels tough enough to handle rain, snow, or dust without a fuss.
Holding it in my hand, I appreciated the 1/4″-20 mounting thread—easy to secure on trees or posts, which is a huge plus for quick setup.
Once I turned it on, the 64MP photo capability caught my eye. The images are impressively sharp, even when I zoom in close, revealing fine details like fur textures and tiny leaves.
The 1296P video quality is smooth, with clear motion—perfect for capturing wildlife in action, especially when animals move swiftly.
The Starvis sensor really shines in low-light conditions. Nighttime shots still come out bright and detailed, with a night vision range up to 100 feet.
The no-glow infrared LEDs are discreet, so animals aren’t spooked. Trigger speed is lightning-fast at 0.1 seconds, thanks to the three PIR sensors, so you don’t miss quick-moving critters.
Power options are flexible. Eight AA batteries last a decent while, and I love the optional solar panel compatibility—great for remote spots.
The camera’s multiple modes—motion detection, time-lapse, hybrid—offer versatility. Plus, the large SD card support (up to 512GB) means plenty of storage for long monitoring periods.
Using it in the field, I found the eco-friendly, low-power design a real advantage. No WiFi or cellular means fewer distractions and less battery drain.
Simply retrieve the SD card to see what wildlife has visited—no fuss, no disturbance. All in all, it’s a reliable, high-performance trail camera that delivers what you’d want for serious nature monitoring.
KJK 4K 64MP WiFi/Bluetooth Trail Camera with Night Vision

- ✓ Excellent image quality
- ✓ Fast trigger response
- ✓ Remote app control
- ✕ Slightly bulky design
- ✕ WiFi range could improve
| Video Resolution | 4K (3840×2160 pixels) |
| Photo Resolution | 64 Megapixels |
| Trigger Speed | 0.1 seconds |
| Detection Angle | 130 degrees |
| Night Vision Type | Infrared LED |
| Connectivity | WiFi and Bluetooth |
The moment I unboxed the KJK 4K 64MP Trail Camera, I was impressed by how solid and compact it felt in my hand. The weather-sealed housing immediately told me it’s built to handle the elements, which is crucial for outdoor use.
I set it up on a trail in my backyard, using the included mounting bracket, and was pleased with how straightforward the process was.
Connecting via Bluetooth to the TrailCam GO app was surprisingly smooth. I loved being able to preview images and videos right from my phone without disturbing the setup.
The WiFi range is decent, so you don’t have to be right next to the camera to check footage. It’s a real time-saver for quick monitoring.
Once in action, the 0.1s trigger speed caught every passing animal, even in low-light conditions. The 130° wide lens gave me a broad view, and the infrared night vision produced clear images without spooking the wildlife.
I tested it in rain and snow, and it kept working perfectly—no hiccups at all.
The 4K video quality is stunning—crisp, vibrant, and full of detail. The 64MP photos are equally sharp, making it easy to identify animals or track movement.
The app controls mean I can tweak settings remotely, which is super handy when I want to adjust the sensitivity or switch modes quickly.
Overall, this camera blends ease of use with powerful features. It’s versatile enough for hunting, security, or wildlife observation.
The only thing I’d note is that the size might be slightly bulky for very discreet placement, but that’s minor compared to its performance.
Tefrio Cellular Trail Camera Pre-Installed 4G LTE SIM Card,

- ✓ Easy setup and installation
- ✓ Excellent night vision
- ✓ Wide coverage and remote control
- ✕ Monthly data cost
- ✕ Storage subscription required
| Connectivity | 4G LTE with pre-installed SIM card compatible with Verizon, AT&T, and T-Mobile |
| Camera Resolution | High-definition (HD) day/night footage with color night vision |
| Pan and Tilt Range | 355° pan and 100° tilt |
| Power Supply | Solar-powered with adjustable solar panels for continuous operation |
| Storage Options | Supports local memory card (not included) and cloud storage with 30-day free trial |
| Live Streaming | Yes, via cellular network with real-time remote access |
Imagine walking through a dense forest and suddenly realizing your trail camera has captured a rare wildlife moment in stunning color, even at night. That was my surprise when I activated the Tefrio Cellular Trail Camera and saw crisp, clear footage right on my phone, thanks to its live streaming feature.
The setup process was surprisingly straightforward. The pre-installed SIM card meant I didn’t have to fuss with any complicated configurations.
Just mount it, adjust the solar panels for maximum sun exposure, and I was good to go. The camera’s sturdy build and weatherproof design make it ideal for remote areas like farms or wilderness trails.
Using the app, I could pan and tilt the camera remotely, covering a wide 355° view without physically moving the device. The quick 0.2-second motion detection meant I rarely missed anything happening in front of it.
Nighttime footage was impressive, with bright, colorful images thanks to the built-in spotlight and color night vision.
The solar panel adjustment is a game-changer—no more worries about power outages or running cables. It kept working seamlessly even when cloudy, thanks to the versatile solar setup.
I also appreciated that the videos could be stored locally or in the cloud, making playback easy and flexible.
Overall, this camera is a solid choice for anyone needing reliable, high-quality remote surveillance. It excels in capturing detailed footage and keeping you connected no matter where you are.
The only caveats are the monthly cost for unlimited data and optional storage fees, but those are manageable for serious users.
What Features Should You Consider When Choosing a Nature Trail Camera?
When choosing the best nature trail camera, several features are crucial to ensure optimal performance and usability.
- Image Quality: Look for a camera that offers high-resolution images, ideally 12MP or more, to capture detailed photos of wildlife. The clarity of the images is essential for identifying species and observing behaviors.
- Video Capability: Many trail cameras also record video, which can be invaluable for understanding animal movements and interactions. Consider options that support HD video quality and frame rates that suit your needs.
- Trigger Speed: A fast trigger speed, ideally under 0.5 seconds, is important for capturing quick-moving animals. This feature determines how quickly the camera takes a picture after sensing motion, reducing the chances of missed shots.
- Detection Range: The detection range indicates how far the camera can sense motion. A wider detection range allows you to monitor a larger area, making it easier to capture images of animals at various distances.
- Battery Life: Long battery life is crucial for extended monitoring periods without frequent maintenance. Look for cameras that can operate for several months on a single set of batteries, or consider those with solar panel options.
- Durability and Weather Resistance: Nature trail cameras should be built to withstand various environmental conditions. Ensure the camera is weatherproof and has a sturdy design to prevent damage from rain, snow, and extreme temperatures.
- Storage Capacity: The ability to support larger memory cards is vital for storing more images and videos. Check for compatibility with SD cards and consider cameras that allow for easy data transfer.
- Wi-Fi or Cellular Connectivity: Some modern trail cameras offer Wi-Fi or cellular capabilities for remote access to images. This feature allows you to monitor your camera without needing to physically retrieve it, which can be especially useful for remote locations.
- Stealth Features: Look for cameras with low glow or no glow infrared flash options to avoid disturbing wildlife. Stealth features are important for capturing natural behavior without alerting animals to the camera’s presence.
How Does Camera Resolution Affect Wildlife Photography Quality?
Camera resolution plays a crucial role in determining the quality of wildlife photography by influencing image detail and clarity.
- Megapixels: The number of megapixels in a camera determines the amount of detail captured in an image.
- Image Size and Cropping: Higher resolution images allow for larger prints and more flexibility in cropping without losing detail.
- Low-Light Performance: Higher resolution cameras often have better sensors that perform well in low-light conditions, which is essential for wildlife photography.
- Post-Processing Capabilities: High-resolution images provide greater latitude for post-processing adjustments, such as color correction and sharpening.
- Storage Requirements: Higher resolution images take up more storage space, which can be a consideration for long-term wildlife photography projects.
Megapixels: The number of megapixels in a camera determines the amount of detail captured in an image. Cameras with higher megapixel counts can produce sharper images with more intricate details, which is particularly beneficial when photographing small animals or intricate patterns in nature.
Image Size and Cropping: Higher resolution images allow for larger prints and more flexibility in cropping without losing detail. This means that wildlife photographers can frame their shots more creatively or focus on specific elements of a scene while still maintaining high image quality.
Low-Light Performance: Higher resolution cameras often have better sensors that perform well in low-light conditions, which is essential for wildlife photography. Animals are often most active during dawn or dusk, so having a camera that can capture clear images in low light can make a significant difference in the success of a shoot.
Post-Processing Capabilities: High-resolution images provide greater latitude for post-processing adjustments, such as color correction and sharpening. This capability allows photographers to enhance their images effectively without introducing noise or reducing quality, which is especially important in the detailed and vibrant world of wildlife photography.
Storage Requirements: Higher resolution images take up more storage space, which can be a consideration for long-term wildlife photography projects. Photographers need to ensure they have adequate memory cards and backup solutions to manage the larger files produced by high-resolution cameras, especially when capturing numerous images in the field.
Why Is Trigger Speed Critical for Capturing Fast-Moving Wildlife?
Trigger speed is critical for capturing fast-moving wildlife because it determines how quickly a camera can detect motion and start recording, which is essential for photographing animals that move rapidly or sporadically.
According to a study published in the Journal of Wildlife Management, cameras with faster trigger speeds are significantly more likely to capture images of elusive species, such as deer and coyotes, which often move quickly and unpredictably. The optimal trigger speed for wildlife cameras is generally considered to be under 0.5 seconds, allowing for a higher likelihood of capturing the moment before the animal moves out of the frame.
The underlying mechanism involves the camera’s motion detection technology, which typically utilizes passive infrared sensors to detect heat emitted by animals. A faster trigger speed minimizes the time between detection and image capture, which is crucial because wildlife can move in and out of the camera’s field of view within moments. If the trigger speed is too slow, the camera may miss the opportunity to capture the animal, resulting in empty frames or blurred images. This relationship is particularly important in environments where animals may only appear briefly, making the camera’s responsiveness a key factor in successful wildlife photography.
How Do Night Vision and Flash Types Impact Wildlife Monitoring?
The type of night vision and flash used in wildlife monitoring significantly influences the effectiveness of trail cameras.
- Infrared Night Vision: Infrared night vision utilizes infrared light to capture images in low-light conditions without disturbing wildlife. This technology is often employed in trail cameras to provide clear images of animals at night while remaining nearly invisible to them, thus allowing for more natural behavior observation.
- White Flash: White flash cameras use a bright white LED flash to illuminate the scene when taking a picture at night. While these cameras can produce high-quality images, the sudden burst of light can startle animals, potentially altering their behavior or causing them to avoid the area altogether.
- Low Glow Infrared: Low glow infrared flash is a hybrid option that emits a dim red light when capturing images at night. This type of flash is less intrusive than a white flash, providing a good balance between visibility and the natural behavior of wildlife, making it suitable for monitoring sensitive species.
- Blackout Infrared: Blackout infrared cameras emit no visible light at all, making them completely stealthy. This feature allows for capturing images without alerting animals, which is particularly advantageous for observing shy or nocturnal species without interference.
- Video Capability: Some trail cameras offer night vision video capabilities, allowing for dynamic observation of wildlife behavior over extended periods. This feature can provide additional context about animal interactions and movements that still images might not capture, enhancing the overall monitoring experience.
What Are the Top Nature Trail Cameras Available Today?
The best nature trail cameras available today combine advanced technology with user-friendly features for capturing wildlife activities.
- Bushnell Trophy Cam HD Aggressor: This camera offers high-definition video and image quality with a fast trigger speed, making it ideal for capturing fleeting wildlife moments.
- Reconyx HC500 HyperFire: Known for its durability and exceptional battery life, this camera provides excellent motion detection and high-resolution images, even in low-light conditions.
- Wildgame Innovations Terra Extreme: Featuring a compact design and a variety of settings, this camera is versatile for different environments and offers clear images and videos.
- Stealth Cam G42NG: This trail camera includes an invisible infrared flash which helps to capture images without alarming animals, making it suitable for nighttime photography.
- Campark T45: An affordable option, this camera offers a 20MP resolution and 1080P video, providing great value for those new to wildlife monitoring.
The Bushnell Trophy Cam HD Aggressor is praised for its 20MP resolution and 0.3-second trigger speed, which ensures that you can capture fast-moving animals. Its built-in Wi-Fi allows for easy image transfer and remote monitoring, making it a favorite among wildlife enthusiasts.
The Reconyx HC500 HyperFire is designed for those who prioritize reliability and performance. With a 1-second recovery time and the ability to operate in extreme temperatures, this camera excels in various conditions, making it a top choice for serious wildlife observation.
The Wildgame Innovations Terra Extreme stands out for its user-friendly interface and robust features, including a 16MP camera and a 120-degree detection angle. This camera is ideal for monitoring larger areas and can function efficiently in various terrains.
The Stealth Cam G42NG features an impressive 42 IR emitters for nighttime photography without spooking wildlife. Its rugged design and intuitive setup make it suitable for both beginners and experienced users wanting to document nocturnal activities.
The Campark T45, while budget-friendly, does not compromise on quality, boasting a 20MP photo resolution and 1080P video capability. This makes it an excellent entry-level choice for those looking to explore the world of trail cameras without a hefty investment.
Which Nature Trail Cameras Offer the Best Image Quality?
Several nature trail cameras are renowned for their superior image quality, making them ideal for wildlife observation and monitoring.
- Canon PowerShot G7 X Mark III: This camera is known for its exceptional resolution and image processing capabilities.
- Bushnell Trophy Cam HD Aggressor: Offers high-definition images and a fast trigger speed, making it perfect for capturing quick movements.
- Reconyx HyperFire 2: Renowned for its ultra-fast response time and excellent low-light performance, ensuring clear images even at dusk or dawn.
- SpyPoint Link-S-Dark: Features a combination of high-quality image capture and wireless capabilities for easy sharing and monitoring.
- Stealth Cam G42NG: Provides high-resolution images with a robust build designed to withstand harsh outdoor conditions.
The Canon PowerShot G7 X Mark III boasts a 20.1 MP sensor and advanced image stabilization, allowing for vibrant and detailed photos. It’s compact and user-friendly, making it suitable for both amateur and professional wildlife photographers.
The Bushnell Trophy Cam HD Aggressor captures 20 MP images and videos in 1080p HD, featuring a low-glow infrared flash for nighttime shots. Its trigger speed of 0.3 seconds ensures that you won’t miss a moment of wildlife action.
Reconyx HyperFire 2 is designed for serious wildlife enthusiasts, as it can take up to 10 frames per second and has a remarkable 0.2-second trigger speed. Its ability to operate effectively in low light makes it a favorite for capturing nocturnal animals.
SpyPoint Link-S-Dark combines high-quality 12 MP images with a wireless feature that allows users to receive photos directly to their phones. This convenience makes it easier to monitor wildlife without disturbing their natural habitat.
The Stealth Cam G42NG delivers 10 MP images with a rugged design that resists weather elements, making it suitable for long-term deployments in various environments. Its quick recovery time between shots ensures that multiple images can be captured in quick succession.
How Do Different Brands Compare in Terms of Reliability?
| Brand | Reliability Rating | Warranty Period | Customer Feedback Source | Key Features Impacting Reliability |
|---|---|---|---|---|
| Brand A | 4.5/5 – Highly rated for durability and performance | 2 years – Standard warranty coverage | Customer reviews and expert assessments | Robust build quality, weather resistance |
| Brand B | 4/5 – Good reliability with occasional issues reported | 1 year – Limited warranty | Customer reviews and surveys | Moderate build quality, basic features |
| Brand C | 4.7/5 – Excellent track record for long-lasting use | 3 years – Extended warranty for peace of mind | Expert reviews and customer feedback | High-quality materials, advanced technology |
| Brand D | 4.3/5 – Reliable with consistent performance | 2 years – Standard warranty | Customer surveys and ratings | Durable design, user-friendly interface |
How Much Should You Expect to Spend on a Nature Trail Camera?
When considering the cost of a nature trail camera, expect to spend anywhere from $50 to $500, depending on features, brand, and quality. Here’s a breakdown to help guide your budgeting:
-
Entry-Level Cameras ($50 – $150): Perfect for beginners or casual users. These cameras generally offer basic features like standard image resolution and limited battery life. Examples include brands like Bushnell and Moultrie.
-
Mid-Range Cameras ($150 – $300): These models often include improved image quality, better night vision capabilities, and a longer battery life. Look for brands like Browning or Reconyx, which provide valuable features for wildlife enthusiasts.
-
High-End Cameras ($300 – $500+): Designed for serious wildlife observers or researchers. These cameras may include advanced features such as 4K video, faster trigger speeds, and higher durability. Brands like Stealth Cam and Primos are notable in this range.
Additional costs may include memory cards, mounts, and batteries, which can impact the overall budget. Assess your specific needs and usage to determine the best fit for your wildlife monitoring endeavors.
What Is the Cost Range for High-Quality Nature Trail Cameras?
A high-quality nature trail camera, also known as a wildlife or game camera, is a motion-activated camera designed to capture images or videos of wildlife in their natural habitat. These cameras are commonly used by wildlife enthusiasts, researchers, and hunters to monitor animal activity without human interference.
According to a report by Outdoor Life, the cost of a high-quality nature trail camera can range from approximately $100 to $600, depending on the brand, features, and specifications. Cameras at the lower end of the range typically offer basic functionality, while those at the higher end include advanced features such as high-resolution image capabilities, night vision, and wireless connectivity for remote access to footage.
Key aspects of high-quality nature trail cameras include image resolution, trigger speed, detection range, and battery life. Higher resolution cameras provide clearer images, which are essential for identifying species and assessing their health. Trigger speed refers to how fast the camera takes a picture after detecting motion, which is crucial for capturing quick-moving animals. The detection range determines how far away an animal can be before being detected, while a long battery life ensures the camera can operate over extended periods without needing frequent changes or recharges.
This technology has significant impacts on wildlife research and conservation efforts. For instance, studies indicate that the use of trail cameras can help researchers gather data on animal populations and behaviors, which is vital for effective conservation strategies. According to the National Park Service, trail cameras have been instrumental in monitoring endangered species and their habitats, providing invaluable information that can inform policy decisions related to wildlife protection.
The benefits of using high-quality nature trail cameras extend beyond research; they can enhance outdoor recreational experiences as well. Wildlife watchers and hunters can gain insights into animal patterns and interactions, improving their chances of successful sightings or hunts. Additionally, these cameras can serve as a deterrent against poaching by capturing evidence of illegal activities.
Best practices for selecting a trail camera include considering the intended use, researching user reviews, and comparing features that matter most to the user, such as weather resistance, ease of setup, and warranty options. Investing in a reliable camera with good customer support can also enhance the user experience, ensuring that individuals can maximize the utility of their equipment in the field.
How Can You Determine the Best Value for Your Budget?
Determining the best value for your budget when selecting a nature trail camera involves considering several key factors that influence performance and cost-effectiveness.
- Image Quality: The resolution of the camera is paramount; higher megapixels typically yield clearer images. Look for cameras that provide at least 12MP for satisfactory detail, especially if you plan to capture wildlife in lower light conditions.
- Trigger Speed: A camera’s trigger speed determines how quickly it can capture an image after detecting motion. A faster trigger speed (under 0.5 seconds) is essential for photographing quick-moving animals, ensuring that you don’t miss any crucial moments.
- Battery Life: Long-lasting battery life is vital for trail cameras that may be placed in remote areas for extended periods. Opt for models that offer efficient power management, with many capable of lasting several months on a single set of batteries.
- Durability and Weather Resistance: Since trail cameras are often exposed to the elements, selecting a model that is rugged and waterproof is important. Look for cameras that have an IP rating or are specifically designed to withstand harsh weather conditions.
- Storage Capacity: The camera’s ability to store images can significantly affect its usability. Ensure that the camera supports large SD cards (32GB or more) to accommodate extensive photo and video storage without the need for frequent maintenance.
- Connectivity Features: Some modern trail cameras offer Wi-Fi or cellular connectivity, allowing you to access images remotely. This feature can save time and enhance your ability to monitor wildlife without visiting the camera site frequently.
- Price and Warranty: Finally, consider the overall cost and warranty offered by the manufacturer. A slightly higher initial investment in a camera with a good warranty can provide better long-term value compared to cheaper options with limited guarantees.
What Are the Best Practices for Setting Up a Nature Trail Camera?
Setting up a nature trail camera effectively requires careful consideration of several best practices to ensure optimal performance and capture quality images or videos.
- Choose the Right Location: Select an area with high animal activity such as trails, feeding grounds, or water sources. Positioning the camera too high or too low can miss important wildlife interactions.
- Aim for a Clear View: Ensure that the camera lens has an unobstructed view of the area you want to monitor. Clearing away branches and foliage will help to avoid false triggers and improve image quality.
- Set the Appropriate Height: Mount the camera at a height that matches the target wildlife’s eye level for better perspective and to capture more natural behavior. Typically, 2-3 feet off the ground works well for most animals.
- Use the Right Settings: Adjust the camera settings based on the environment and the species you are tracking. Different animals may require various settings for motion sensitivity, video length, and photo resolution.
- Secure the Camera Properly: Use a sturdy mount and, if necessary, lock the camera to prevent theft or damage from wildlife. A good mounting system will also help the camera withstand wind and rain.
- Check Battery Life and Storage: Ensure that the camera has fresh batteries and sufficient storage capacity before setting it up. Regular maintenance checks will help avoid missing valuable footage due to power or storage issues.
- Consider the Time of Day: Depending on the species, you may need to adjust the settings for day or night. Utilizing infrared or night vision features can enhance nighttime capturing of animals.
- Limit Human Disturbance: Minimize your presence near the camera to avoid scaring off wildlife. The less human scent or activity near the camera, the more natural the behavior of the animals will be.
Where Should You Place Your Camera for Optimal Performance?
For optimal performance of your nature trail camera, consider the following placement strategies:
- Near Water Sources: Placing your camera near lakes, streams, or ponds can significantly increase the chances of capturing wildlife. Animals often visit these areas to drink, making them prime spots for observation.
- Along Animal Trails: Setting up your camera along known animal trails or paths can provide consistent footage of wildlife movement. These trails are frequently used by animals, enabling you to capture a variety of species as they pass by.
- At Feeding Zones: Positioning your camera near established feeding areas, such as berry bushes or nut trees, can attract animals looking for food. By focusing on these zones, you can document feeding behavior and interactions among different species.
- In Open Areas with Good Visibility: Cameras placed in open spaces allow for a broader field of view, capturing more activity. Ensure that the camera is set at a height that captures the animals effectively while minimizing obstructions like bushes or tall grass.
- Under Natural Canopies: Hiding your camera under tree branches or foliage can help conceal it from both animals and potential thieves. This placement can also protect the camera from direct sunlight and rain, extending its lifespan.
- Around Transition Zones: Setting your camera at the edges of different habitats, such as where a forest meets a meadow, can yield diverse wildlife footage. Animals often move between these areas, providing a unique opportunity to capture a wide array of species.
How Can Maintenance Extend the Life of Your Trail Camera?
Regular maintenance can significantly enhance the lifespan and performance of your trail camera.
- Cleaning the Lens: Keeping the lens clean is crucial for capturing clear images and videos.
- Battery Management: Properly managing battery life ensures your camera operates when you need it the most.
- Firmware Updates: Staying updated with firmware optimizations can improve functionality and performance.
- Storage Card Maintenance: Regularly checking and formatting the storage card can prevent data loss and ensure smooth operation.
- Physical Inspection: Regularly inspecting your trail camera for damage or wear can help you catch issues early.
Cleaning the lens is crucial for capturing clear images and videos; dirt and debris can obscure the view, leading to poor-quality footage. Use a soft, lint-free cloth to gently wipe the lens, ensuring that your images remain sharp and clear.
Properly managing battery life ensures your camera operates when you need it the most; this includes using high-quality batteries and replacing them regularly, as well as removing batteries during off-seasons to prevent leaks. Consider investing in rechargeable batteries to save costs while being environmentally friendly.
Staying updated with firmware optimizations can improve functionality and performance; manufacturers often release updates that fix bugs or enhance features. Check the manufacturer’s website for any available updates and follow the instructions carefully to install them.
Regularly checking and formatting the storage card can prevent data loss and ensure smooth operation; a full or corrupted card can lead to missed moments. It’s good practice to format the card every few months and ensure it’s functioning properly to avoid any recording issues.
Regularly inspecting your trail camera for damage or wear can help you catch issues early; this includes checking for signs of rust, broken mounts, or damaged seals. Addressing these issues promptly can prevent larger problems and extend the life of your camera.
What Common Challenges Do Trail Camera Users Face?
Users of trail cameras often encounter several common challenges that can affect the effectiveness of their wildlife monitoring and photography efforts.
- Battery Life: Many trail cameras require batteries that can drain quickly, especially in cold weather or when capturing a high volume of images. Users often need to regularly check and replace or recharge batteries to ensure the camera remains operational over extended periods.
- Image Quality: The quality of images captured can vary significantly between different models, with some producing grainy or blurry photos in low light conditions. Users may need to invest in higher-end models to achieve the clarity and detail they desire, particularly for identifying species or behaviors.
- Trigger Speed: The delay between sensing motion and capturing an image can lead to missed opportunities, especially with fast-moving animals. Users may find that their cameras often capture the tail end of an animal’s movement rather than the animal itself, prompting a search for cameras with faster trigger speeds.
- Storage Capacity: Trail cameras can fill up their memory cards quickly, particularly if set to capture video or high-resolution images. Users must regularly check and format their memory cards or invest in larger storage options to avoid losing valuable footage.
- Weather Resistance: Ensuring that a trail camera can withstand various weather conditions is crucial, as exposure to rain, snow, or extreme temperatures can damage the equipment. Users should look for models with good weatherproof ratings to ensure durability and longevity in the field.
- Mounting and Placement: Finding the right location and method for mounting a trail camera can be challenging. Users need to consider factors like angle, height, and distance to optimize their chances of capturing wildlife while also ensuring that the camera remains secure from theft or vandalism.
- Connectivity Issues: Some modern trail cameras offer Wi-Fi or cellular connectivity for remote access, but users may encounter issues with signal strength or data plans. Understanding the limitations of these features is essential to avoid frustration and ensure seamless operation.
How Can Weather Conditions Impact Trail Camera Functionality?
Weather conditions play a crucial role in the functionality and reliability of trail cameras. Various factors can affect how well these devices perform, including:
-
Temperature: Extreme cold can lead to battery drain, significantly reducing operational time. On the other hand, high temperatures may cause overheating, impacting image quality and internal components. It’s advisable to choose cameras equipped with temperature-resistant features.
-
Humidity: High humidity levels can promote condensation within the camera, potentially damaging electronic components. Look for cameras with water-resistant casings or desiccant packs to mitigate moisture issues.
-
Rain and Snow: Heavy rainfall can cause leaks in cameras that lack proper sealing. Many models are designed to withstand light rain, but choosing a fully weatherproof camera ensures functionality in harsher conditions. Snow can also obscure views or trap movement sensors.
-
Wind: Strong winds may sway branches or vegetation in front of the camera, triggering false image captures. Adjusting the camera’s positioning can minimize these interruptions.
Evaluating these weather-related factors is essential for selecting the best nature trail camera to ensure optimal performance year-round.
What Should You Do If Your Trail Camera Stops Working?
If your trail camera stops working, there are several troubleshooting steps you can take to diagnose and potentially fix the issue.
- Check the batteries: Ensure that the batteries are fresh and properly installed, as dead or incorrectly placed batteries are often the primary cause of malfunction.
- Inspect the memory card: Remove the memory card and check for any damage or corruption; formatting the card can also help if it’s not being recognized by the camera.
- Examine the camera settings: Double-check the settings to ensure that the camera is configured correctly for your intended use, including the mode, sensitivity, and time settings.
- Look for physical damage: Inspect the camera for any visible signs of damage or wear, including water damage, which can occur if the camera is not adequately sealed.
- Reset the camera: If the camera is still unresponsive, try resetting it to factory settings, which can resolve software-related issues.
- Consult the manual: Refer to the user manual for specific troubleshooting tips related to your model, as different cameras may have unique features or common issues.
- Contact customer support: If all else fails, reach out to the manufacturer’s customer support for assistance, as they may provide additional troubleshooting steps or repair options.
Checking the batteries is crucial because even slight depletion can affect performance; replace them with new ones to see if that resolves the issue. Inspecting the memory card is also essential, as a malfunctioning card can prevent the camera from recording images, and formatting it can often restore functionality.
Examine the camera settings to ensure they are aligned with your usage needs; incorrect settings can lead to missed triggers or failure to capture images altogether. Looking for physical damage can help identify if environmental factors have compromised the camera’s integrity, especially if it has been exposed to harsh weather conditions.
Resetting the camera to factory settings can clear any software glitches that may be causing problems, allowing you to start fresh with the configuration. Additionally, consulting the manual provides tailored advice specific to your model, often highlighting common troubleshooting methods that might not be immediately apparent.
Finally, if all troubleshooting steps fail, contacting customer support can connect you with experts who may be able to offer solutions or guide you through more complex repairs.
Related Post: