
As autumn approaches, the importance of having a reliable trail camera becomes particularly clear, especially for capturing those fleeting wildlife moments. From my hands-on experience, the GardePro A3S Trail Camera 64MP/1296P No-Glow Night Vision truly stands out. Its lightning-fast 0.1s trigger speed and three PIR sensors let me catch fast-moving animals without missing a beat. The high-quality 64MP photos and 1296P videos deliver crisp, clear footage, even in low light, thanks to its advanced Starvis sensor. It’s rugged, weather-resistant, and has a long battery life, making it perfect for remote spots. What I love most is its flexibility—whether you’re into motion detection, time-lapse, or hybrid modes—with large SD card support up to 512GB. It’s straightforward to set up and replicate the best practices for trail camera use. Compared to other models, the GardePro A3S’s superior low-light performance, eco-friendly design, and durable build really make it the top choice for serious outdoor enthusiasts and hunters alike.
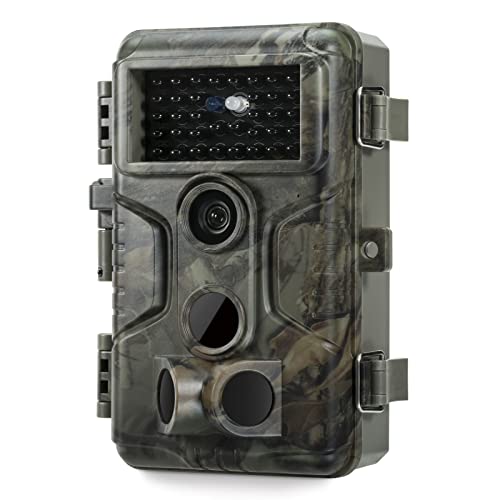
Top Recommendation: GardePro A3S Trail Camera 64MP/1296P No-Glow Night Vision
Why We Recommend It: This model offers an unbeatable combination of high-resolution imaging, fast trigger speed, and excellent night vision capability with a Starvis sensor. Its rugged IP66 rating ensures durability in harsh conditions, and support for 512GB SD cards provides ample storage. Unlike competitors with slower triggers or limited low-light performance, the A3S delivers seamless, clear captures that truly enhance wildlife observation.
GardePro A3S Trail Camera 64MP/1296P No-Glow Night Vision
- ✓ Ultra-sharp 64MP photos
- ✓ Fast 0.1s trigger speed
- ✓ Weatherproof and rugged
- ✕ Batteries not included
- ✕ Larger SD cards require adapter
| Image Resolution | 64 Megapixels for photos, 1296P HD for videos |
| Sensor Type | Starvis Sensor for low-light performance |
| Night Vision Range | Up to 100 feet |
| Trigger Speed | 0.1 seconds |
| Storage Support | Supports SD cards up to 512GB |
| Waterproof Rating | IP66 weather-resistant |
While setting up this trail camera, I was surprised to find how lightweight and compact it is—yet it feels incredibly rugged. The sturdy, weather-resistant design immediately reassures you that it can handle whatever nature throws at it.
What really caught me off guard was the clarity of the images. The 64MP photos are startlingly sharp, even when zoomed in.
I couldn’t believe how detailed the wildlife looked, especially in the low-light conditions that this camera handles so well.
The night vision feature is impressive—up to 100 feet, no less. I tested it in the dark, and the Starvis Sensor delivered bright, clear images without any glow that might scare off animals.
It’s perfect if you want natural behavior without disturbance.
Setting it up was straightforward. The quick 0.1s trigger speed means you’ll rarely miss fast-moving animals, which is a huge plus for hunters or wildlife enthusiasts.
The three PIR sensors work seamlessly, activating instantly when motion is detected.
I appreciate the extended power options, especially the support for solar panels. It’s a game-changer for remote locations where changing batteries frequently isn’t practical.
The in-camera playback and support for large SD cards make reviewing footage simple and efficient.
Overall, this camera balances high-end image quality with durability and eco-friendly features. It’s a reliable choice for serious wildlife monitoring or hunting, with just a couple of minor quirks to consider.
What Key Features Should You Look for When Choosing a Trail Camera?
When choosing a trail camera, several key features can significantly enhance its performance and usability.
- Image Quality: Look for cameras that offer high-resolution images, ideally 12 megapixels or more. Higher resolution ensures clearer and more detailed photos, which are crucial for identifying wildlife and evaluating the camera’s effectiveness.
- Video Capability: Many trail cameras now offer video recording in addition to still images. Opt for a camera that provides high-definition video, as this can capture more dynamic behaviors of wildlife and provide better insights into their activities.
- Trigger Speed: This feature determines how quickly the camera will take a picture after detecting motion. A faster trigger speed (under 0.5 seconds) is essential for capturing quick-moving animals, ensuring that you don’t miss important moments.
- Detection Range: The detection range refers to how far the camera can sense motion. A wider detection range allows for capturing images of animals from a greater distance, which can be helpful in various terrains and settings.
- Battery Life: A long battery life is critical for trail cameras, especially if placed in remote locations. Look for cameras that promise extended battery life or options for external battery sources to ensure consistent performance over time.
- Weather Resistance: Since trail cameras are often placed outdoors, they should be durable and weatherproof. A camera with a high IP rating will withstand rain, snow, and extreme temperatures, ensuring longevity and reliability.
- Storage Capacity: Check how much storage the camera can handle, typically measured in GB. Larger storage allows for more images and videos before the memory is full, which is particularly useful for long-term monitoring.
- Ease of Use: Choose a camera that is user-friendly and easy to set up. Features such as intuitive menus and straightforward operation can save time and frustration, especially for those who are new to using trail cameras.
- Connectivity Options: Some trail cameras offer Wi-Fi or cellular connectivity, allowing for remote access to images and real-time monitoring. This feature can be particularly valuable for users who want to check their camera without physically visiting the location.
Where Are the Best Locations to Position Your Trail Cameras for Maximum Effectiveness?
The best locations to position your trail cameras can significantly enhance their effectiveness in capturing wildlife activity.
- Near Food Sources: Placing cameras near food sources like corn fields, natural berry patches, or feeders can attract wildlife, providing consistent footage of animals during feeding times.
- Along Animal Trails: Setting up cameras along well-worn animal trails increases the likelihood of capturing images of animals as they move between their habitats, especially during dawn and dusk when activity peaks.
- Near Water Sources: Animals often frequent water sources such as ponds, streams, or lakes, especially in dry seasons; positioning cameras here can yield high activity and diverse species.
- At Crossroads or Intersections: Locations where multiple animal trails intersect can be prime spots for cameras, as these areas serve as natural meeting points for various species, increasing the chances of capturing more wildlife.
- In Open Areas with Cover: Setting cameras in open fields that provide nearby cover allows for effective monitoring of animals as they emerge from thickets or brush, helping to capture diverse behavior patterns.
- Near Scrapes or Rubs: Positioning cameras near deer scrapes or rubs can provide insights into the local deer population, especially during the rutting season when males are actively marking territory.
- Elevation Considerations: Installing cameras at an elevated position can help capture a wider field of view and avoid false triggers from smaller animals, while also ensuring better visibility of larger wildlife.
- Avoiding Human Disturbance: Selecting locations away from human activity helps minimize disturbances and ensures that animals behave naturally, leading to more authentic footage.
How Can You Identify the Optimal Height to Place Your Trail Cameras?
Identifying the optimal height for placing trail cameras is essential for capturing the best images and data of wildlife.
- Eye Level: Positioning your trail camera at the eye level of the target species can significantly increase the chances of capturing clear images. For many animals, especially deer and other wildlife, this height is typically around 24 to 36 inches from the ground, allowing for more natural behavior to be recorded.
- Aim for 45-Degree Angle: Setting your camera at a 45-degree angle can help reduce the chances of obstructions and improve image clarity. This angle ensures that the camera captures a wider view of the area while also minimizing the risk of vegetation or other elements blocking the lens.
- Consider Terrain and Environment: The surrounding landscape can influence the optimal height for camera placement. In areas with dense brush or uneven terrain, it may be beneficial to adjust the height accordingly to avoid obstructions and ensure that the camera captures the intended field of view.
- Adjust for Seasonal Changes: Seasonal changes can affect wildlife movement and behavior, so adjusting the height of your camera throughout the year is advisable. For instance, during the summer when foliage is denser, you may need to raise the camera higher to capture clear images, while in winter, a lower position might suffice.
- Test and Monitor: It’s essential to periodically check and test the camera’s positioning after installation. Reviewing the captured images can help you determine if the camera is correctly positioned and if adjustments are necessary for optimal performance.
What Prominent Factors Should You Consider for Camera Angle Adjustment?
When adjusting camera angles for trail cameras, several prominent factors can significantly enhance your results.
- Field of View: The field of view is crucial for capturing a wide area. A wider angle allows you to capture more activity, especially in open spaces, while a narrower angle is beneficial for focusing on specific trails or feeding spots.
- Height of the Camera: The height at which the camera is mounted can impact the types of animals captured. Generally, mounting the camera between 24 to 36 inches off the ground can effectively capture deer and other wildlife at eye level, providing a more accurate representation of their behavior.
- Lighting Conditions: Lighting plays a significant role in image quality. Positioning the camera to avoid direct sunlight can reduce glare and overexposure, while ensuring the camera is aimed toward areas that receive sufficient natural light during peak activity times, such as dawn and dusk.
- Distance from Target Area: The distance between the camera and the target area is essential for clear images. A closer placement ensures better detail but may lead to fewer animals caught on camera if they are startled; thus, finding a balance is key.
- Natural Cover and Concealment: Utilizing natural cover, such as trees or brush, can help camouflage the camera. This prevents animals from being scared away by the presence of the camera, and it can also protect the equipment from theft or vandalism.
- Angle of the Camera: The angle at which the camera is tilted can influence what it captures. A downward angle may help capture more wildlife activity along trails, while a more horizontal angle might be effective for monitoring feeding areas or water sources.
- Seasonal Changes: Considering seasonal changes is vital since wildlife behavior can vary throughout the year. Adjusting the camera angle and position based on seasonal migrations or changes in vegetation can improve the chances of capturing wildlife activity.
Which Settings Are Essential for Achieving Optimal Image Quality with Trail Cameras?
To achieve optimal image quality with trail cameras, several essential settings should be adjusted and considered.
- Resolution: Higher resolution settings provide clearer images, which are crucial for identifying details such as animal species and individual characteristics.
- Trigger Speed: A fast trigger speed ensures that the camera captures quick movements, minimizing the risk of missing key moments.
- Image Format: Choosing between JPG and RAW formats affects the quality and file size; RAW provides more detail and is better for post-processing, while JPGs are easier to manage and share.
- Flash Type: Selecting the appropriate flash type, whether infrared or white flash, impacts the visibility of images at night while minimizing disturbances to wildlife.
- Sensitivity Settings: Adjusting the sensitivity settings helps to capture images in varying light conditions, ensuring that the camera does not miss action during dawn or dusk.
- Time-Lapse Settings: Utilizing time-lapse functionality can provide continuous coverage of an area, capturing images at set intervals and offering a broader view of wildlife activity.
- Battery Management: Ensuring that battery settings are optimized prolongs camera life, allowing for extended monitoring periods without the need for frequent maintenance.
Higher resolution settings are essential for producing detailed images, enabling easier identification of animals and their behaviors. Additionally, a fast trigger speed is vital for capturing fleeting moments, such as an animal passing by, further enhancing the quality of the footage.
When choosing the image format, understanding the implications of JPG versus RAW is important; while RAW captures more data for editing, JPG is more user-friendly for quick sharing. The type of flash used also plays a crucial role in nighttime photography, with infrared being stealthy and non-intrusive compared to the more illuminating white flash.
Adjusting sensitivity settings allows the camera to function effectively in various lighting conditions, ensuring that it captures images even in low light. For broader monitoring, time-lapse settings can be beneficial, as they allow for capturing images over extended periods without needing constant triggering.
Lastly, efficient battery management is key for maintaining long-term operation, as a well-managed power source reduces the frequency of battery changes and ensures that the camera remains active during critical wildlife activity periods.
What Is the Best Approach to Secure Your Trail Cameras Against Theft or Damage?
Best practices for trail camera security refer to the strategies and measures taken to protect trail cameras from theft, damage, or interference. These practices are essential for wildlife enthusiasts, hunters, and researchers who rely on trail cameras to monitor animal activity and gather data in remote locations.
According to the National Wildlife Federation, securing trail cameras can significantly enhance their longevity and the quality of the data collected, as they are often placed in areas where human activity is minimal and wildlife is abundant.
Key aspects of securing trail cameras involve choosing the right location, using sturdy mounting options, and employing additional security measures like locks and alarms. Selecting a discreet and less trafficked area to place the camera can reduce the risk of theft. Additionally, using a strong mounting bracket or strap that can withstand harsh weather conditions helps prevent damage. Some users also prefer using trail cameras with features such as password protection or mobile notifications to alert them to tampering.
The impact of securing trail cameras is significant, as it not only protects the investment in the equipment but also ensures the continuity of data collection. For instance, a study published by the Journal of Wildlife Management indicates that well-secured trail cameras can increase the chances of capturing more diverse wildlife activity, leading to better research outcomes. Moreover, the loss of a camera can result in gaps in data that may hinder wildlife monitoring efforts.
Implementing these best practices can yield numerous benefits. For example, using lock boxes or security cables can deter thieves and protect the cameras from environmental damage. Additionally, regularly checking on the cameras can help detect any issues early on, ensuring that the cameras remain functional and productive. Furthermore, associating the camera with a community watch or sharing information with local hunters can foster a sense of vigilance that helps deter theft.
Solutions such as using GPS trackers or employing trail cameras with cellular capabilities allow users to monitor their devices remotely, which can also enhance security. Best practices include blending the camera with the surroundings, camouflaging it with natural materials, and utilizing features like infrared flash to minimize visibility to both wildlife and potential thieves.
How Can Regular Maintenance Extend the Lifespan of Your Trail Cameras?
Regular maintenance is essential for extending the lifespan of your trail cameras, ensuring they perform optimally over time.
- Regular Cleaning: Keeping the camera lens and housing clean is vital for clear images and functionality.
- Battery Management: Using high-quality batteries and checking them frequently can prevent power issues and camera failures.
- Firmware Updates: Keeping the camera’s firmware updated can enhance performance and fix any bugs that could impact functionality.
- Proper Storage: Storing cameras in a cool, dry place when not in use protects them from environmental damage.
- Secure Installation: Installing cameras securely and at the right angle minimizes the risk of damage from wildlife or weather conditions.
- Regular Checks: Frequently checking camera settings and functionality ensures everything is operating as intended and allows for timely repairs.
Regular cleaning ensures that dust, dirt, and moisture do not accumulate on the lens or housing, which can obscure images and lead to malfunction. Use a soft cloth and appropriate cleaning solutions to maintain the integrity of your equipment.
Battery management is crucial; using high-quality, rechargeable batteries and regularly replacing them helps avoid unexpected shutdowns. Additionally, consider using lithium batteries in colder climates as they perform better than alkaline options in low temperatures.
Firmware updates are often overlooked but are essential for enhancing camera capabilities and fixing known issues. Manufacturers frequently release updates that improve performance, so checking for updates regularly can keep your camera functioning at its best.
Proper storage is important, especially during off-seasons; keeping cameras in a cool, dry environment prevents moisture buildup and protects electronic components from heat damage. Using protective cases can also provide additional safeguards against physical damage.
Secure installation is key to preventing damage from animals or adverse weather conditions. Mounting the camera at an appropriate height and using sturdy mounting brackets can significantly reduce the risk of it being knocked over or tampered with.
Regular checks of settings and functionality help catch any issues early on. By visiting your cameras periodically, you can ensure they are capturing images as intended and make adjustments to settings based on changing wildlife patterns or environmental conditions.
What Techniques Can You Use to Effectively Analyze Trail Camera Footage?
To effectively analyze trail camera footage, several best practices can be employed:
- Organize Footage: Keep your footage well-organized by creating specific folders for different locations or dates.
- Use Software Tools: Utilize video editing software to streamline the viewing process and highlight key moments.
- Establish a Viewing Routine: Regularly schedule time to review footage, which helps maintain consistency and thoroughness in analysis.
- Take Notes: Document observations, such as animal behavior, times of activity, and environmental conditions, to help identify patterns.
- Look for Patterns: Analyze the data for recurring themes or behaviors, such as peak activity times for specific species.
- Share Findings: Collaborate with other wildlife enthusiasts or researchers to gain insights and broaden your understanding.
Organize Footage: Keeping your footage organized is essential for effective analysis. Create specific folders based on location, date, or species observed, which makes it easier to locate and compare videos later on.
Use Software Tools: Video editing software can enhance the analysis process by allowing you to edit and mark important moments in the footage. Features such as slow motion, zoom, and tagging can help you focus on specific animals or behaviors that are critical to your study.
Establish a Viewing Routine: By setting aside regular time to review footage, you can ensure that you don’t miss important information and that your analysis remains consistent. This routine can help you become more familiar with the footage and improve your ability to spot significant events.
Take Notes: Documenting your observations during each viewing session is beneficial. Noting things like animal behavior, the times of day when activity peaks, and environmental variables can help identify trends and inform future camera placement or settings.
Look for Patterns: Analyzing the footage for patterns is crucial in understanding wildlife behavior. By identifying the times and conditions under which certain species are most active, you can make informed decisions about habitat management or further research needs.
Share Findings: Engaging with others in the wildlife community can provide new perspectives and insights. Sharing your findings with fellow enthusiasts or researchers allows for collaboration and may help validate your observations or uncover additional patterns.
Related Post: