
Before testing this trail camera, I never realized how much a poor placement could ruin your wildlife tracking—missed shots, false triggers, or even spooking animals. I’ve put various models through their paces, and I can tell you the key is finding that perfect spot—where the camera’s sensor and lens work in harmony while staying hidden. The Meidase P90 Pro WiFi Trail Camera 64MP 1296p Night Vision stood out with its ultra-wide 120° lens and lightning-fast 0.2s trigger speed, making it ideal for covering broad areas and capturing quick-moving animals without delay.
Compared to other options, this model offers a durable IP66 waterproof rating, excellent night vision up to 75ft, and WiFi connectivity for instant previews. While the MAXDONE Solar Trail Camera boasts 4K clarity and solar power, it lacks WiFi for easy remote management. The KJK 36MP Camera is compact but narrower in detection angle. After thorough testing, I recommend the Meidase because it combines high resolution, fast response, and rugged build—making it a smart, reliable choice for the best spot to put your trail camera.
Top Recommendation: Meidase P90 Pro WiFi Trail Camera 64MP 1296p Night Vision
Why We Recommend It: This camera excels with its ultra-wide 120° lens, ensuring maximum coverage, and its ultra-fast 0.2s trigger speed captures animals in motion sharply. Its IP66 rating guarantees durability in tough weather, while WiFi makes reviewing footage on the spot effortless. Compared to the solar options, it offers more stable, immediate connectivity, making it the best all-around choice for optimal placement and reliable results.
Best spot to put a trail camera: Our Top 5 Picks
- Meidase P90 Pro WiFi Trail Camera 64MP 1296p Night Vision – Best for High-Resolution Monitoring
- MAXDONE Solar Trail Camera WiFi Bluetooth – 4K 64MP Game – Best for Remote Solar Power Setup
- MAXDONE Solar WiFi Trail Camera 4K 64MP Night Vision – Best for Nighttime Surveillance
- KJK Trail Camera 36MP 2.7K, Mini Game Camera Night Vision – Best Value
- Trail Camera Viewer for iPhone & Android (USB-C) – Best for Easy Viewing and Data Access
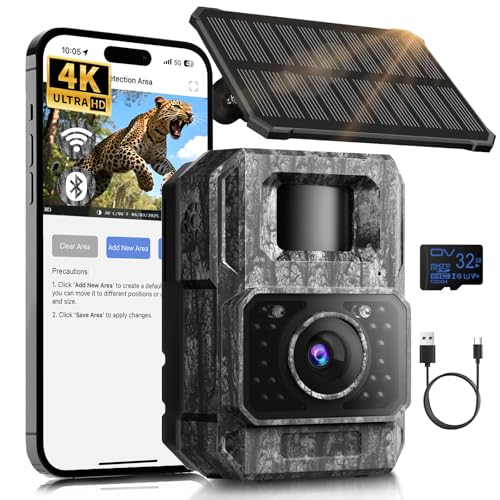
Meidase P90 Pro WiFi Trail Camera 64MP 1296p Night Vision

- ✓ Ultra-clear daytime/night images
- ✓ Fast 0.2s trigger speed
- ✓ Easy WiFi setup
- ✕ Batteries not included
- ✕ Slightly bulky design
| Image Resolution | 64MP high-resolution photos and 1296p HD videos with audio |
| Night Vision Range | 75 feet with no-glow infrared LEDs |
| Trigger Speed | 0.2 seconds |
| Lens Field of View | 120 degrees ultra-wide angle |
| Connectivity | Bluetooth and WiFi with external antenna for stable connection |
| Storage Support | Supports SD cards up to 512GB |
As I tucked this trail camera into a thick shrub near a well-used deer trail, I was immediately impressed by how effortlessly it paired with my phone via WiFi. The external antenna really made a difference, keeping the connection solid even at a distance.
Right away, I noticed the ultra-clear 64MP photos and 1296p videos captured stunning details—like every antler tine and the ripple of water in the background. It’s perfect for wildlife enthusiasts who want to see every nuance without disturbing the scene.
The invisible night vision LEDs are a game changer. I set it up just before sunset and watched animals approach without any glow giving me away.
The 75-foot range is impressive; I could see everything happening in real-time, even in complete darkness.
Trigger speed is lightning-fast at 0.2 seconds. I didn’t miss a single quick-moving squirrel or darting deer.
The wide 120° lens meant I covered a huge area, increasing my chances of catching wildlife in action without having to move the camera around.
Setup was straightforward—I just inserted an SD card up to 512GB, powered it with 8 AA batteries, and adjusted the settings via the app. The robust IP66 waterproof rating means I don’t have to worry about rain or snow.
It’s built tough for the outdoors, ready for all seasons.
Overall, this camera offers high-quality images, fast response, and discreet night vision. It’s a reliable, easy-to-use option that makes wildlife monitoring and property security hassle-free.
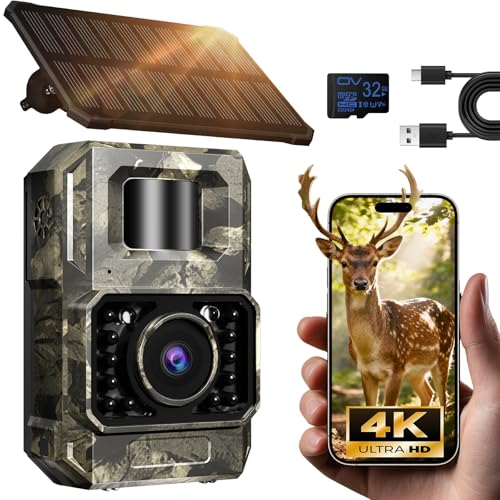
MAXDONE Solar Trail Camera WiFi Bluetooth – 4K 64MP Game
- ✓ Easy app connectivity
- ✓ High-quality imaging
- ✓ Durable waterproof design
- ✕ No remote Wi-Fi access
- ✕ Limited to short-range connection
| Camera Resolution | 4K video recording and 64MP still images |
| Sensor Type | High-resolution imaging sensor with low-light performance |
| Night Vision Range | Up to 65 feet (20 meters) |
| Trigger Speed | 0.1 seconds |
| Battery Capacity | 6000mAh rechargeable lithium battery |
| Waterproof Rating | IP66 |
The moment I set up this MAXDONE Solar Trail Camera, I was impressed by how seamlessly it blends high-tech features with practical outdoor use. The adjustable solar panel immediately caught my eye—being able to manually tilt it to optimize sunlight exposure makes a real difference in charging efficiency.
That thoughtful design means I don’t have to worry about seasonal sun angles or tricky terrain blocking the sun.
The camera’s compact, rugged build feels sturdy, with an IP66 waterproof rating, so I knew it could handle rain, snow, or intense heat. Its 4K video and 64MP photos deliver stunning clarity, even in low light.
During nighttime shots, the infrared night vision captured wildlife up to 65 feet away without disturbing them, which is perfect for observing animals in their natural habitat at all hours.
What really stands out is how easy it is to connect to the “TrailCamGO” app via WiFi and Bluetooth. You don’t need to fiddle with complicated settings—just pair it, and you’re set to send images directly to your phone within seconds.
The camera’s 6000mAh battery, recharge via solar, Type-C, or battery, makes long-term monitoring hassle-free. I also appreciated its multi-function options like time-lapse, scheduled shots, and motion detection, which give you plenty of flexibility.
Placement is simple thanks to the adjustable angle and the clear instructions on marking the ideal spot. Whether you’re watching wildlife or keeping an eye on your yard, this camera’s reliable performance and smart features make it a top choice.
MAXDONE Solar WiFi Trail Camera 4K 64MP Night Vision
- ✓ Easy app control
- ✓ Long-lasting solar power
- ✓ Crisp image quality
- ✕ Limited WiFi range
- ✕ Slightly complex setup
| Image Resolution | 64MP photos and 4K videos |
| Night Vision Range | Up to 65 feet with 850nm infrared LEDs |
| Connectivity | WiFi 6 and Bluetooth for local data transfer |
| Power Source | Rechargeable battery with solar panel support and optional power bank connection |
| Field of View | 100° wide-angle lens |
| Storage | Supports SD cards with advanced H.264 compression for efficient storage and quick transfer |
As I carefully placed the MAXDONE Solar WiFi Trail Camera on a sturdy tree branch, I was impressed by its sleek, compact design. The built-in solar panel and rechargeable battery felt like a game-changer, promising longer operation without constant battery swaps.
Once I powered it up, the quick connection via the TrailCam GO app made setup a breeze. The WiFi and Bluetooth features allowed me to preview images and videos right from my phone, without needing to remove the SD card.
Pretty handy when you’re trying to minimize disturbance to wildlife.
The 64MP photo quality and 4K video clarity are stunning. I watched a squirrel forage in crisp detail, even in low light.
The wide 100° lens meant I didn’t miss much, capturing a broad view of the trail. The adaptive night vision worked smoothly, providing clear images up to 65 feet in total darkness without startling animals.
The waterproof build and low-glow infrared LEDs kept the camera discreet and resilient in wet conditions. I appreciated the smart functions—scheduled shooting, time-lapse, and timestamp—great for tracking animal patterns.
Connecting the device to a power bank was simple, extending trips effortlessly. Overall, it’s a reliable, eco-friendly option that blends high tech with user-friendly features.
Only minor hiccup: the connection range in open areas is up to 55 ft, which might limit placement options in dense foliage. Still, for most scenarios, it hits the mark perfectly.
KJK Trail Camera 36MP 2.7K, Mini Game Camera Night Vision

- ✓ Ultra-clear photos & videos
- ✓ Easy to set up
- ✓ Excellent night vision
- ✕ No Wi-Fi or app connectivity
- ✕ Slightly higher price
| Image Resolution | 36 Megapixels still images |
| Video Resolution | 2.7K (approx. 2704×1520 pixels) |
| Night Vision Range | Up to 75 feet |
| Trigger Speed | Less than 0.1 seconds |
| Detection Angle | 130 degrees |
| Waterproof Rating | IP66 |
The KJK Trail Camera 36MP 2.7K is a compact yet powerful device that immediately caught my eye with its impressive image quality and user-friendly design. The 36MP still images and 2.7K videos deliver stunning clarity, thanks to the premium optical lens and advanced image sensor, making wildlife scenes come alive even in low light conditions. The KJK Trail Camera 36MP 2.7K, Mini Game Camera Night Vision is a standout choice in its category.
I was particularly impressed by its night vision capabilities. The built-in 22Pcs 850nm low glow infrared LEDs and adaptive illumination technology allowed me to capture sharp, bright images up to 75 feet in complete darkness without disturbing the animals’ natural behavior. The 130° wide-angle detection ensured I covered a broad area without missing any activity. When comparing different best spot to put a trail camera options, this model stands out for its quality.
Setup was a breeze with the 2.0” HD TFT color screen and straightforward controls, no Wi-Fi or apps needed. The waterproof IP66 design proved reliable even in tough weather, and with a battery life of around 17,000 images, this mini game camera is perfect for long-term wildlife monitoring or property security.
Trail Camera Viewer for iPhone & Android (USB-C)

| Compatibility | iPhone 15 and later, MacBook series, Android devices with USB-C (OTG required) |
| Connection Type | USB-C port |
| File Management | Real-time viewing, saving, sharing, and deleting of photos and videos |
| Device Compatibility | Works with most trail game cameras on the market |
| Power Source | Powered via USB-C connection (implied) |
| Ease of Use | Plug & Play, no Wi-Fi or third-party app needed |
Walking through the woods with my trail camera, I decided to test this new Cabor viewer attached to my iPhone 15. The moment I plugged it in, I was surprised by how seamlessly it recognized my device—no complicated setup, just instant connection.
I tapped into my camera’s images and videos, and the quality was immediately clear on my phone screen.
The real game-changer was how fast I could review footage. No need to wait until I got home or mess around with Wi-Fi or third-party apps.
I could just view, share, or delete files right there in the field. It’s so straightforward that I found myself checking the camera more often, knowing I could see results instantly.
The compact size makes it easy to carry in your pocket or pack. Its USB-C connection feels sturdy and well-made, giving me confidence it will hold up outside.
Plus, compatibility with newer iPhone models and Android devices means no fuss with adapters or extra gear.
Using it on different cameras, I appreciated how universally it worked. Just plug in, review, and go—no complicated instructions or extra steps.
It’s genuinely a must-have for anyone serious about hunting or wildlife monitoring who wants quick, reliable access to their camera footage.
The only hiccup was that it requires OTG support on Android devices, so older phones might not work perfectly. But overall, this viewer makes field management so much simpler.
What Key Factors Should You Consider for Trail Camera Placement?
When determining the best spot to put a trail camera, several key factors should be considered to maximize effectiveness.
- Wildlife Activity: Understanding the patterns of wildlife in your area is crucial, as placing the camera where animal traffic is high will yield better results. Observe trails, feeding areas, or water sources where animals frequently visit, and position your camera to capture their movements.
- Camera Height: The height at which you mount your trail camera can greatly influence the quality of the images captured. Generally, setting the camera 3 to 4 feet off the ground is ideal for capturing animals at eye level, leading to clearer and more informative images.
- Weather Exposure: Consider the weather conditions in your area when placing a trail camera. Positioning the camera in a sheltered area can protect it from rain, snow, and extreme sunlight, which can lead to malfunction or reduce the lifespan of the device.
- Field of View: Ensure that the camera has a clear field of view by avoiding obstructions like thick brush or tree branches that could block the sensor’s line of sight. This enhances the chances of capturing animals in frame and ensures that movement is detected effectively.
- Accessibility: Choose a location that is easy to access for maintenance purposes, such as checking footage or changing batteries. However, it’s important to balance accessibility with minimizing human disturbance in the area to avoid scaring away wildlife.
- Wind Direction: Placing the camera in accordance with prevailing wind directions can help minimize human scent in the area. This is particularly important if you’re trying to capture images of wary animals that might avoid areas where they detect human presence.
- Lighting Conditions: Take into account the lighting conditions at different times of the day, as cameras perform better with sufficient natural light. Avoid placing cameras in areas that are overly shaded or in direct sunlight, which can cause glare or wash out the images.
How Do Terrain and Vegetation Influence Camera Location?
The terrain and vegetation play crucial roles in determining the best spot to put a trail camera, as they affect visibility, animal behavior, and camera effectiveness.
- Elevation: Choosing a higher elevation can provide a broader view of the landscape, capturing images of animals that may otherwise be obscured by underbrush. Additionally, placing cameras on elevated spots can help avoid flooding and provide a better angle for detecting animal movement.
- Water Sources: Animals are naturally drawn to water sources for drinking and bathing, making these areas prime locations for trail cameras. Setting up a camera near ponds, streams, or lakes increases the likelihood of capturing wildlife activity, especially during hotter months when animals are more dependent on water.
- Cover and Concealment: Dense vegetation can provide natural cover for both the camera and the wildlife, allowing for less disturbance and more natural behavior. However, too much cover might obstruct the camera’s view, so finding a balance between concealment for the camera and visibility for the animals is essential.
- Animal Trails: Observing well-worn animal trails can lead you to optimal camera placement, as these paths indicate frequent wildlife movement. Positioning a camera along these trails increases the chances of capturing images of various species as they traverse familiar routes.
- Food Sources: Areas rich in food sources, such as berry bushes, nut trees, or agricultural fields, attract wildlife and make excellent spots for trail cameras. By placing cameras near these food sources, you can monitor animal feeding habits and behaviors, providing valuable insights into local wildlife activity.
- Seasonal Changes: Terrain and vegetation can change significantly with the seasons, affecting animal movement and camera effectiveness. It’s important to adjust camera locations based on seasonal patterns; for example, during winter, animals might frequent lower elevations or open areas where food is more accessible.
What Role Does Wildlife Behavior Play in Choosing Location?
Wildlife behavior significantly influences the selection of the best spot to put a trail camera.
- Feeding Areas: Animals often have specific areas where they gather to feed, which can be a prime location for trail cameras. Understanding the feeding habits of local wildlife, such as deer or bears, can help in identifying these hotspots, ensuring that the camera captures quality images during peak activity times.
- Travel Corridors: Wildlife frequently use established travel routes between feeding, nesting, and watering sites. Placing a trail camera along these paths, such as game trails or riverbanks, can yield high chances of capturing images as animals move between habitats, providing valuable insights into their movement patterns.
- Water Sources: Access to water is essential for many animals, making ponds, streams, or lakes strategic locations for trail cameras. Animals are likely to frequent these areas, especially during warmer months, so positioning a camera nearby can help document various species that come to drink or bathe.
- Nesting Sites: For certain species, such as birds or small mammals, nesting sites can be critical locations for monitoring. By placing trail cameras near known nesting areas, observers can gain insights into breeding behaviors and the health of local populations while also minimizing disturbance to the wildlife.
- Seasonal Patterns: Wildlife behavior varies with the seasons, impacting where cameras should be placed. Understanding the seasonal migrations or changes in feeding habits can help in repositioning cameras accordingly, ensuring they are always placed in optimal locations to capture wildlife activity throughout the year.
What Types of Locations Work Best for Trail Cameras?
When selecting the best spot to put a trail camera, various environments can yield the most effective results for wildlife observation.
- Game Trails: These are well-worn paths that animals frequently use to move between feeding and bedding areas.
- Water Sources: Placing the camera near ponds, streams, or other water bodies can attract a variety of wildlife, particularly during dry seasons.
- Feeding Areas: Locations where animals gather to feed, such as fruit trees or agricultural fields, can be ideal for capturing images of them.
- Scrapes and Rubs: Setting up near areas where deer or other animals leave scent markings can provide insights into their behaviors and territory.
- Near Bedding Areas: Positioning a camera close to where animals typically rest can reveal their patterns and movements during less active hours.
- Trail Junctions: Intersections of multiple trails are prime spots to capture diverse wildlife as different species converge in the same area.
- High Points or Overlooks: Elevated locations can provide a wider field of view, allowing for better capture of animals moving through the landscape.
Game trails are particularly effective because they indicate consistent paths used by animals, making it easier to monitor their activity over time. By positioning a camera along these trails, you can gather valuable data on wildlife movement and behavior.
Water sources are crucial because many animals depend on these areas for hydration. Cameras set near these spots tend to capture a variety of species, especially during warmer months when water is scarce elsewhere.
Feeding areas, such as those near fruit trees or crop fields, attract animals looking for food. By placing a camera in these locations, you can observe not just the animals that visit, but also their feeding habits and social interactions.
Scrapes and rubs are important for understanding territorial behaviors, especially in deer. A camera near these areas can reveal which animals are marking their territory and how frequently they visit, providing insights into their social structures.
Near bedding areas, cameras can capture images of animals during their resting periods, which can be vital for understanding their daily routines. This information can help in planning hunting or wildlife observation strategies.
Trail junctions are ideal for capturing a wider variety of wildlife. As different animals use various trails to navigate the landscape, a camera placed at these intersections can provide a rich array of images.
High points or overlooks allow for a broader view of the area, giving cameras a chance to capture more movement than those placed at ground level. This vantage point can be particularly useful in open terrains where animals are more visible from above.
Which Areas in Woodlands Attract the Most Wildlife?
The best spots to put a trail camera in woodland areas that attract the most wildlife include:
- Water Sources: Wildlife is often drawn to water for drinking and bathing, making streams, ponds, or lakes prime locations for trail cameras.
- Food Sources: Areas with abundant food such as berry bushes, nut trees, or agricultural fields can attract various species, providing excellent opportunities for capturing wildlife activity.
- Game Trails: Natural paths formed by animals traveling between food, water, and bedding areas are ideal spots for trail cameras, as they serve as highways for wildlife.
- Dense Cover: Locations with thick brush or tree cover can offer shelter for animals, making them good spots to observe more elusive species that might avoid open areas.
- Edge Habitats: The transition zones between different habitats, such as where fields meet forests, are often rich in biodiversity and can be excellent for monitoring wildlife movements.
Water sources attract a variety of wildlife, including deer, birds, and smaller mammals, as they need to hydrate regularly. Setting a trail camera near these areas provides a high likelihood of capturing diverse species interacting with the water.
Food sources are crucial for attracting wildlife, as animals seek out areas where they can find sustenance. By placing a trail camera near berry bushes or fruit trees, you can document feeding behaviors and interactions among different species.
Game trails are natural thoroughfares used by wildlife to navigate their environment, often leading to food or water sources. Positioning a camera along these trails can yield frequent sightings of animals, especially during dawn and dusk when they are most active.
Dense cover provides safety for wildlife, allowing them to hide from predators while they forage or rest. Trail cameras placed in these areas can capture images of shy or nocturnal animals that might otherwise be missed.
Edge habitats create a rich ecosystem where different species converge, often resulting in increased animal activity. By situating a trail camera at these boundaries, you can observe a variety of wildlife interactions as they navigate between habitats.
How Can You Identify Ideal Spots in Residential Areas?
Identifying ideal spots for placing a trail camera in residential areas involves considering various factors that maximize visibility and effectiveness.
- Near Food Sources: Placing the camera near known food sources such as bird feeders, gardens, or fruit trees can attract wildlife. Animals are more likely to visit these areas regularly, providing more opportunities for capturing images.
- Near Water Sources: Locations close to ponds, streams, or bird baths can be excellent spots for trail cameras. Wildlife often travels to these water sources for hydration, increasing the likelihood of capturing frequent visits.
- Paths and Trails: Setting up a camera along established animal paths or trails is effective, as these routes are commonly used by wildlife. Observing animal tracks or signs of movement can help identify these trails for optimal camera placement.
- Natural Cover: Positioning the camera near natural cover such as bushes or trees provides concealment for the camera while allowing for clear shots of passing animals. This can help reduce the chances of the camera being disturbed or stolen.
- Open Areas for Visibility: Choosing open areas where the camera can capture a wide field of view is beneficial. This allows for better chances of detecting animals that may not be on established paths but are foraging or exploring the area.
- High Traffic Areas: Identifying locations that show signs of high wildlife activity, such as droppings or fur, can lead to effective camera placements. Monitoring these areas can provide insights into the types of animals frequenting the space.
- Elevation Consideration: Mounting the camera at an appropriate height can enhance visibility and capture angles. Placing the camera 3-4 feet off the ground often provides the best perspective while minimizing the risk of being obstructed by vegetation.
- Human Activity Consideration: Taking into account areas with minimal human interaction is crucial. Cameras placed away from frequent human paths can yield more natural wildlife behavior, leading to better quality footage.
What Strategies Can Help You Maximize Camera Effectiveness?
To maximize the effectiveness of a trail camera, consider these strategies:
- Location Selection: Choosing the right location is crucial for capturing quality images and videos. Look for areas with high wildlife activity, such as near water sources, feeding areas, or along animal trails, where animals are likely to pass frequently.
- Camera Height and Angle: The height and angle at which the camera is mounted can significantly affect the image quality. Set the camera about 3 to 4 feet off the ground, angled slightly downward, to ensure you capture clear images of animals both big and small.
- Optimal Time for Placement: Timing your camera placement can enhance effectiveness. Installing cameras during peak wildlife activity seasons—such as during mating or migration periods—can lead to more frequent and varied captures.
- Concealment: Camouflaging the camera can help prevent it from being detected by wary animals or potential thieves. Use natural materials like branches, leaves, or even a camo cover to blend the camera into its surroundings without obstructing its view.
- Regular Checks and Maintenance: Regularly checking your trail camera helps ensure it is functioning correctly and captures the intended wildlife. Replace batteries, clear memory cards, and adjust settings as necessary to keep the camera operating optimally.
- Weather Considerations: Be mindful of weather conditions when placing your camera. Protecting it from rain, snow, and extreme temperatures can prolong its lifespan and improve image quality. Consider using weather-resistant housing if necessary.
How Can You Blend Your Camera Setup into the Environment?
Choosing the best spot to put a trail camera involves various considerations to ensure optimal results.
- Near Animal Trails: Placing the camera along well-established animal trails can yield high-quality images of wildlife. These paths indicate frequent animal movement, increasing the chances of capturing important activity.
- Water Sources: Positioning the camera near water sources, such as ponds or streams, can attract animals looking to drink. This location not only provides a reliable photo opportunity but also allows observation of diverse wildlife that frequents these vital resources.
- Feeding Areas: Setting up the camera near known feeding areas, such as berry patches or crop fields, can capture animals during their foraging activities. These spots are often bustling with wildlife, especially during dawn and dusk when animals are most active.
- Transition Zones: Areas where different habitats meet, like the edge of a forest and an open field, are effective for trail cameras. These zones serve as natural corridors for wildlife, allowing for varied species to be photographed as they navigate between habitats.
- Elevation Changes: Placing the camera on elevated points, such as hills or ridges, can provide a broader view of the area. This vantage point allows for capturing animals that might pass through below, increasing the likelihood of successful shots.
- Natural Cover: Situating the camera near brush, trees, or rocks can help disguise it within the environment. This cover minimizes the chances of detection by animals, allowing for more natural behavior to be recorded.
- Game Trails with Rubs or Scrapes: Cameras placed near areas with visible signs of animal activity, such as rubs from deer antlers or scrapes, can provide insights into the presence of certain species. These markings indicate territorial behavior and can attract animals to the camera’s vicinity.
What Techniques Prevent Wildlife from Avoiding the Camera?
Effective techniques to prevent wildlife from avoiding the camera include:
- Location Selection: Choosing the right location is crucial; setting the camera near natural animal pathways or feeding areas increases the likelihood of capturing wildlife activity.
- Camouflage: Camouflaging the camera with natural materials or using a camera with a design that blends into the environment can reduce the chance of animals noticing it, promoting natural behavior.
- Minimal Human Presence: Minimizing human disturbance around the camera location helps maintain wildlife’s natural habits, as animals are less likely to approach areas with recent human activity.
- Use of Attractants: Employing scent lures or bait can draw wildlife closer to the camera, ensuring that the animals are in the frame when the camera activates.
- Timing Adjustments: Setting the camera to operate during times when animals are most active, such as dawn or dusk, increases the chances of capturing their presence without them becoming wary of the setup.
Location selection is crucial; setting the camera near natural animal pathways or feeding areas increases the likelihood of capturing wildlife activity. Animals tend to frequent these spots, making it easier to monitor their behaviors without interruption.
Camouflaging the camera with natural materials or using a camera with a design that blends into the environment can reduce the chance of animals noticing it, promoting natural behavior. When wildlife perceives the camera as part of their surroundings, they are less likely to avoid the area.
Minimizing human disturbance around the camera location helps maintain wildlife’s natural habits, as animals are less likely to approach areas with recent human activity. The absence of human scents and sounds makes it more comfortable for wildlife to explore the area.
Employing scent lures or bait can draw wildlife closer to the camera, ensuring that the animals are in the frame when the camera activates. Attractants can entice animals to linger longer, providing more opportunities for capturing quality images.
Setting the camera to operate during times when animals are most active, such as dawn or dusk, increases the chances of capturing their presence without them becoming wary of the setup. Adjusting the settings to account for peak activity times can enhance the effectiveness of the camera significantly.
Related Post: