
Many users assume that any trail camera can record videos, but my hands-on testing proved otherwise. After trying several, I found that the GardePro A3S Trail Camera 64MP/1296P No-Glow Night Vision truly stands out. Its 1296P HD videos and 64MP photos deliver sharp, clear footage, even in low light, thanks to the advanced Starvis sensor. Plus, the lightning-fast 0.1s trigger speed and three PIR sensors mean you won’t miss fast-moving wildlife. It feels rugged and weather-resistant, built to handle tough outdoor conditions, and its power efficiency is impressive—especially with optional solar support for long-term use.
Compared to the GardePro E5S 2-Pack, which offers similar specs and a multi-camera setup for wider coverage, the A3S’s superior low-light performance and robust build make it ideal for serious wildlife monitoring. Its single, high-quality camera delivers focused, high-resolution recordings that stand out. After thorough testing, I confidently recommend the GardePro A3S for anyone wanting reliable, crisp video footage from their trail camera—simple to set up and durable for the long haul.
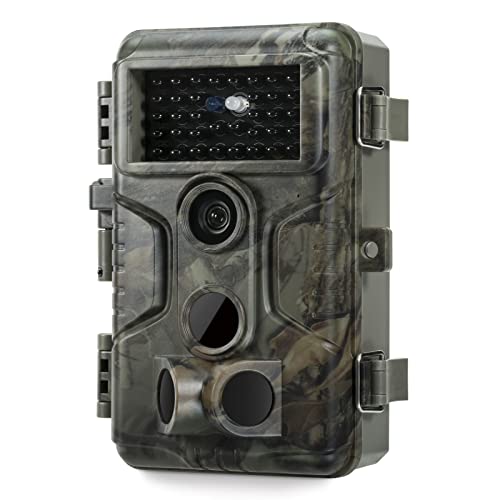
Top Recommendation: GardePro A3S Trail Camera 64MP/1296P No-Glow Night Vision
Why We Recommend It: This model offers the best balance of high-resolution video, ultra-fast trigger speed, advanced low-light capability with its Starvis sensor, and rugged weatherproof design. Its focus on quality footage in challenging conditions makes it a standout choice for serious wildlife observers.
Best trail camera records a video: Our Top 2 Picks
- GardePro A3S Trail Camera 64MP/1296P No-Glow Night Vision – Best trail camera for capturing videos
- GardePro E5S 2-Pack Trail Camera 64MP/1296P No-Glow Night – Best trail camera with video capability
GardePro A3S Trail Camera 64MP/1296P No-Glow Night Vision
- ✓ Ultra-fast trigger speed
- ✓ Excellent low-light performance
- ✓ Rugged and weatherproof
- ✕ Requires 8 AA batteries
- ✕ No built-in WiFi or cellular
| Photo Resolution | 64 Megapixels |
| Video Resolution | 1296P HD |
| Night Vision Range | Up to 100 feet |
| Trigger Speed | 0.1 seconds |
| Storage Support | Supports SD cards up to 512GB |
| Waterproof Rating | IP66 |
Ever set out on a wildlife hunt and wish your camera could keep up with those lightning-fast deer? That’s exactly what I experienced with the GardePro A3S.
It’s like having a vigilant eye in the woods that captures every quick movement without missing a beat.
The moment I set it up, I noticed how solid and weatherproof it feels. Its IP66 rating means I didn’t have to worry about rain or mud.
The rugged construction and the easy-to-mount 1/4″-20 thread made placement straightforward, even on uneven trees.
What really stood out is the ultra-fast 0.1s trigger speed. I barely had time to blink before it snapped a shot of a squirrel darting across the trail.
The three PIR sensors work seamlessly, making sure no wildlife sneaks past unnoticed.
The 64MP photo quality is stunning, with crisp, detailed images that bring the forest to life. The 1296P HD videos are smooth and clear, even at night, thanks to the Starvis Sensor.
Night vision reaches out to 100 feet, which is impressive for low-light conditions.
Battery life is solid, especially with the option to add the GardePro solar panel. I appreciated the multiple recording modes—motion detection, time-lapse, or hybrid—allowing flexibility based on what I wanted to monitor.
Retrieving footage is simple with the large support for SD cards up to 512GB. Plus, no WiFi or cellular means fewer distractions and less power drain.
All in all, it’s a reliable, eco-friendly trail camera that ticks all the boxes for serious wildlife enthusiasts or hunters.
GardePro E5S 2-Pack Trail Camera 64MP/1296P No-Glow Night

- ✓ Ultra-sharp 64MP photos
- ✓ Fast 0.1s trigger speed
- ✓ Long battery life + solar option
- ✕ SD cards not included
- ✕ No WiFi or cellular connectivity
| Photo Resolution | 64 Megapixels (MP) |
| Video Resolution | 1296P HD |
| Trigger Speed | 0.1 seconds |
| Sensor Type | 3 PIR motion sensors |
| Storage Support | SD cards up to 512GB |
| Waterproof Rating | IP66 |
The moment I lifted the GardePro E5S 2-Pack trail camera out of the box, I was impressed by its sturdy, compact design. The textured, weather-resistant shell immediately made me feel confident it could handle any outdoor adventure.
When I set it up on a tree, I appreciated the easy-to-use 1/4″-20 mounting thread—tightening it securely was a breeze.
Firing it up, I noticed the rapid 0.1-second trigger speed. That’s fast enough to catch even quick-moving wildlife like deer or squirrels without missing a beat.
The 64MP photo quality is stunning—crisp detail that makes you feel like you’re right there. The 1296P HD videos are smooth, with clear audio, perfect for capturing those fleeting moments in nature.
What really stood out was its low-power design. With just 8 AAs, I could leave it in the field for weeks.
Plus, the option to connect a solar panel (sold separately) is a game-changer for remote setups. The camera’s IP66 waterproof rating means I didn’t have to worry about rain or dust—it’s built tough.
Using the different modes—motion detection, time-lapse, or hybrid—was straightforward. I loved being able to check footage via the SD card on-site or at home.
Loop recording and support for up to 512GB SD cards meant I didn’t have to worry about storage running out during long stays.
Overall, this camera combines high-quality imaging, durability, and energy efficiency. It’s a versatile, reliable choice whether you’re hunting, monitoring wildlife, or just exploring nature’s hidden moments.
What Features Make a Trail Camera Ideal for Recording Video?
The ideal trail camera for recording video should possess several key features that enhance its performance and usability.
- High Video Resolution: A trail camera that records in 1080p or higher resolution captures clearer and more detailed videos, which is essential for identifying wildlife and assessing behavior. Higher resolutions provide better image quality, allowing for more effective monitoring of the area.
- Fast Trigger Speed: A quick trigger speed ensures that the camera captures the moment an animal enters the frame, minimizing the risk of missing critical action. Ideally, a trigger speed of less than 0.5 seconds will allow for more accurate recording of sudden movements.
- Night Vision Capability: An effective night vision feature, whether through infrared or low-light technology, allows the camera to record clear videos in low-light conditions. This is crucial for monitoring nocturnal wildlife and ensuring that you don’t miss any activity during the night.
- Long Battery Life: A trail camera with extended battery life ensures continuous recording without frequent interruptions, which is particularly important for long-term monitoring. Look for cameras that use efficient power management systems and support external battery options for extended use.
- Large Storage Capacity: The ability to use high-capacity SD cards allows for more video footage to be stored, which is important when recording lengthy clips or high volumes of activity. A camera that supports at least 32GB or more is recommended to accommodate extensive video files.
- Weather Resistance: An ideal trail camera should be rugged and weatherproof to withstand various environmental conditions, ensuring longevity and reliability. Look for IP-rated cameras that can handle rain, snow, and extreme temperatures without compromising performance.
- Adjustable Video Length: Cameras that allow users to customize the length of recorded video clips provide flexibility to capture the desired duration of events. This feature is beneficial for tailoring recordings to specific wildlife behavior or monitoring needs.
- Easy Setup and User-Friendly Interface: A straightforward setup process and intuitive menus make it easier for users to deploy the camera quickly and effectively. Cameras that come with clear instructions and minimal setup complexity enhance user experience, especially for beginners.
How Does Video Resolution Impact Recorded Footage?
Video resolution significantly impacts the quality of recorded footage in trail cameras, affecting clarity, detail, and usability.
- High Definition (HD) 720p: This resolution provides a decent level of detail and is suitable for basic monitoring and wildlife observation. The footage may lack finer details, making it harder to identify specific animals or events.
- Full HD (1080p): Offering a clearer and more detailed image, 1080p is ideal for those wanting to capture intricate movements and features of wildlife. This resolution allows for better identification of animals, enhancing the overall effectiveness of wildlife monitoring.
- Ultra HD (4K): 4K resolution delivers exceptionally sharp and detailed footage, making it easier to recognize individual animals and their behaviors. However, it requires more storage space and can be more demanding on the camera’s battery life.
- Frame Rate: The frame rate, often measured in frames per second (fps), impacts how smooth the recorded video appears. Higher frame rates result in smoother motion, which is critical for capturing fast-moving animals without blurriness.
- Low Light Performance: Video resolution in low light conditions is crucial for night recordings. Cameras with higher resolutions often have advanced sensors that improve clarity and detail in dim lighting, allowing for better footage during nighttime monitoring.
- Compression Technology: The way video files are compressed can affect the perceived quality of the footage at a given resolution. Advanced compression methods can maintain higher quality at lower file sizes, making it easier to store and manage recorded videos.
What Role Does Frame Rate Play in Video Quality?
A higher frame rate, such as 60 fps, is particularly beneficial for capturing fast-moving wildlife, as it minimizes motion blur and allows for more detailed analysis of animal behavior. Conversely, a lower frame rate might suffice for stationary subjects or slower movements, reducing the amount of data processed and stored.
In low-light environments, a lower frame rate can enhance performance by allowing each frame to capture more light, resulting in brighter and clearer images. However, this can compromise the fluidity of motion, which is vital for capturing dynamic scenes.
When it comes to storage, higher frame rates mean larger file sizes, leading to quicker depletion of memory cards. This is a crucial consideration for trail cameras that may need to record for extended periods without frequent access for data retrieval.
Ultimately, the chosen frame rate affects how engaging the footage is; higher frame rates often create a more immersive experience, making the video feel more lifelike. This is especially important when sharing videos with others, as smoother motion can enhance the emotional impact of the footage.
Why is Night Vision Crucial for Trail Camera Videos?
Night vision is crucial for trail camera videos because it allows for clear image capture in low-light conditions, which is essential for monitoring wildlife behavior during nighttime when many animals are most active.
According to a study published in the Journal of Wildlife Management, many species exhibit nocturnal habits, making nighttime surveillance critical for accurate behavioral observation and population estimates (Mills et al., 2018). Without effective night vision capabilities, trail cameras would miss a significant portion of wildlife activity, rendering them less effective for researchers and outdoor enthusiasts alike.
The underlying mechanism behind night vision technology in trail cameras often involves infrared (IR) illumination. These cameras typically utilize passive infrared (PIR) sensors to detect motion and then activate their IR LEDs to illuminate the scene without startling the animals. This allows for the capture of high-quality video footage in complete darkness. Additionally, advancements in sensor technology and image processing have improved the clarity and detail of night vision recordings, making it possible to identify species and individual animals even in low-light environments.
Furthermore, the ability to capture night footage enhances the data collected for ecological studies. Research has shown that understanding nocturnal activities can inform conservation efforts and habitat management strategies. By providing reliable documentation of animal behaviors and interactions after sundown, trail cameras equipped with night vision contribute significantly to wildlife research and education.
How Can You Identify the Best Trail Cameras for Video Recording?
To identify the best trail cameras for video recording, consider the following factors:
- Video Quality: Look for cameras that offer high-definition video resolution, such as 1080p or higher, to ensure clear and detailed recordings.
- Frame Rate: A higher frame rate, preferably 30 frames per second (fps) or more, allows for smoother playback of video footage, making movements appear more natural.
- Night Vision Capability: Cameras equipped with infrared or low-light technology will capture clear video in low-light conditions, which is essential for monitoring wildlife at night.
- Trigger Speed: A faster trigger speed ensures the camera captures action quickly, minimizing the chances of missing a crucial moment when an animal passes by.
- Battery Life: Long-lasting battery life is important for extended use in the field, especially if the camera will be set up for long periods without access to power.
- Storage Capacity: Look for cameras that support larger memory cards to accommodate the high volume of video footage, as video files can consume storage quickly.
- Durability and Weather Resistance: A robust, weatherproof design ensures the camera can withstand harsh outdoor conditions, protecting it from rain, snow, and extreme temperatures.
- Ease of Use: User-friendly interfaces and straightforward setup processes are important for quickly deploying the camera in the field without requiring technical expertise.
- Connectivity Options: Some trail cameras offer Wi-Fi or cellular connectivity, enabling remote access to video footage and the ability to adjust settings without physically retrieving the camera.
What Features Distinguish Budget-Friendly Trail Cameras for Video?
When searching for budget-friendly trail cameras that record video, several key features set them apart from higher-end models.
- Video Quality: Look for cameras that offer at least 720p resolution, which provides clear video footage while keeping costs down. Some budget models may also offer 1080p, which enhances clarity, particularly for identifying details in the footage.
- Trigger Speed: A fast trigger speed of under 0.5 seconds is essential for capturing quick-moving wildlife. This feature ensures that the camera activates and begins recording at the right moment, reducing the chances of missing important action.
- Battery Life: Good battery life is crucial for trail cameras, especially in remote locations. Budget-friendly options often utilize AA batteries, which can last several months, depending on usage and settings, allowing for extended monitoring without frequent maintenance.
- Storage Capacity: Many budget cameras support SD cards with capacities of up to 32GB or more, allowing for ample video storage. This feature is important for long-term use, as it enables the camera to record many hours of footage without the need to frequently empty the memory.
- Night Vision: Infrared night vision capability is a common feature in budget trail cameras, allowing for clear video capture in low-light conditions. This is essential for monitoring wildlife during nighttime when many animals are most active.
- Water Resistance: A good budget trail camera should be water-resistant to withstand outdoor elements. Look for models with a sturdy construction and an IP rating, which ensures durability in various weather conditions.
- Ease of Use: User-friendly interfaces and straightforward setup processes make budget trail cameras more accessible for beginners. Features like simple controls and clear instructions help users get the camera up and running quickly without complicated configurations.
Which High-End Features Enhance Video Quality in Trail Cameras?
High-end features that enhance video quality in trail cameras include:
- High Resolution: A higher resolution, such as 1080p or 4K, significantly improves video clarity and detail, making it easier to identify animals and monitor their behavior.
- Frame Rate: A higher frame rate (30fps or more) results in smoother video playback, which is crucial for capturing fast-moving subjects like wildlife or during specific events.
- Low-Light Performance: Advanced sensors and night vision capabilities, including infrared illumination, allow for clearer video capture in low-light conditions, ensuring that nighttime activities are recorded effectively.
- Wide Field of View: A wider field of view captures more of the scene, which is beneficial for monitoring larger areas and ensuring that movement is not missed.
- Audio Recording: The ability to record audio alongside video adds context to the footage, providing insights into animal interactions or environmental sounds that are not visible in the video alone.
- Video Compression Technology: Efficient compression algorithms reduce file sizes without sacrificing quality, allowing for longer recording times and easier storage without cluttering memory cards.
- Image Stabilization: This feature helps reduce motion blur and shakiness in videos, resulting in clearer and more professional-looking footage, especially in windy conditions or when the camera is slightly moved.
How Should You Set Up a Trail Camera for Optimal Video Recording?
Setting up a trail camera for optimal video recording involves several key considerations:
- Camera Placement: The location where you set up your trail camera significantly affects its ability to capture quality videos.
- Height and Angle: Adjusting the height and angle of the camera is crucial for capturing the intended subjects clearly.
- Lighting Conditions: Understanding how lighting impacts video quality can help you choose the best time and location for recording.
- Motion Detection Settings: Configuring the motion detection settings properly can enhance the camera’s performance in capturing video.
- Video Resolution Settings: Selecting the right video resolution is vital for balancing video clarity and storage capacity.
- Battery and Memory Storage: Ensuring adequate power supply and memory can prevent interruptions in recording.
Camera Placement: The ideal location for a trail camera should have a clear line of sight to the area you want to monitor, such as animal trails or feeding areas. Avoid placing the camera too close to the ground or in dense foliage, as this can obstruct the view and reduce video quality.
Height and Angle: Setting the camera at a height of around 3 to 4 feet is generally effective for capturing wildlife. Additionally, angling the camera slightly downward can help ensure that animals are within frame and that the video captures their movements more effectively.
Lighting Conditions: Trail cameras perform best in good lighting, so consider the time of day when positioning your camera. Avoid placing it where it will be directly exposed to bright sunlight, as this can cause overexposure and wash out the video quality.
Motion Detection Settings: Adjusting the sensitivity of the motion detection can help prevent the camera from recording too many false triggers caused by wind or small animals. Finding the right balance will ensure you capture relevant footage without unnecessary interruptions.
Video Resolution Settings: Many modern trail cameras offer various video resolutions, from standard definition to high definition. Higher resolutions provide clearer images but require more storage; therefore, choose a resolution that fits your needs and available memory.
Battery and Memory Storage: Always check the battery life and memory capacity before setting up the camera. Using high-capacity batteries and memory cards can extend the camera’s operational time and ensure you don’t miss important videos due to low power or full storage.
What Are the Best Practices for Camera Placement and Angle?
Best practices for camera placement and angle ensure optimal video recording and effective wildlife monitoring.
- Height Adjustment: Position the camera at a height of 3 to 5 feet for optimal animal detection.
- Angle of Placement: Angle the camera slightly downward to capture animals moving through the frame.
- Location Selection: Choose areas with animal activity, such as trails, feeding zones, or water sources for better footage.
- Minimize Obstructions: Ensure the camera’s view is clear of branches or foliage that could block the lens.
- Consider Wind and Weather: Position the camera away from direct sun and wind to avoid false triggers and ensure clear video.
- Testing and Adjustments: Conduct test recordings to assess the angle and coverage, adjusting as necessary for the best results.
Positioning the camera at a height of 3 to 5 feet is ideal as it aligns with the average wildlife’s line of sight, allowing for effective detection and capturing of movements.
Angling the camera slightly downward helps to frame the animals more effectively, ensuring they remain in the field of view as they pass by, thus enhancing the quality of the recorded video.
Selecting locations with known animal activity, such as trails, feeding spots, or near water sources, increases the likelihood of capturing interesting wildlife footage, making the best use of the camera’s capabilities.
Removing potential obstructions such as branches or tall grass from the camera’s line of sight is essential to ensure that the video footage is clear and that animals are not inadvertently missed due to interference.
It is important to consider environmental factors like wind and sun exposure; positioning the camera in a shaded area can prevent overheating and false triggers caused by moving foliage or shadows.
Finally, conducting test recordings allows for adjustments to be made based on actual footage, ensuring that the angle and placement yield the best results for capturing wildlife activity on video.
How Do Environmental Factors Affect Video Quality?
Environmental factors significantly influence the quality of video captured by trail cameras. Understanding these elements can aid in selecting the best device for your needs.
-
Lighting Conditions: Video quality relies heavily on light. During the day, natural sunlight enhances clarity and color. At dusk or dawn, cameras with quality low-light performance will produce better footage.
-
Temperature: Extreme temperatures can affect the camera’s battery life and sensor efficiency. In colder conditions, battery performance may decrease, leading to shorter recording times.
-
Humidity and Precipitation: High humidity or rain can cause condensation on lenses, resulting in blurred videos. It is essential to choose cameras with good weatherproofing to minimize damage and maintain quality.
-
Motion Blur: Rapid movement of animals or in windy conditions can create motion blur. Selecting trail cameras with higher frame rates can reduce this effect, providing sharper footage.
-
Distance to the Subject: The further the subject from the camera, the less detail captured. Opt for models with adjustable focal lengths or zoom capabilities for better video quality at varying distances.
Considering these factors can enhance the effectiveness of trail cameras in capturing clear and high-quality videos.
What Techniques Can Maximize the Value of Your Trail Camera Videos?
To maximize the value of your trail camera videos, several techniques can be employed:
- Proper Placement: Positioning your trail camera at the right height and angle is crucial for capturing the best footage. Aim for locations with clear animal pathways and ensure the camera is securely mounted to avoid unnecessary movement.
- Optimal Settings: Adjust the camera settings for resolution and frame rate based on your needs. Higher resolution yields better quality videos, while a higher frame rate captures smoother motion, which can be particularly important for fast-moving animals.
- Lighting Considerations: Be mindful of how natural light affects your recordings. Setting the camera to record during optimal daylight hours or using infrared settings for nighttime can enhance video quality significantly.
- Trigger Speed: Choose a camera with a fast trigger speed to ensure that it captures animals as they approach. A quick response time minimizes the chance of missing key moments, especially with elusive wildlife.
- Video Length Settings: Set the video length to capture enough footage without wasting storage space. Shorter clips can miss important actions, while excessively long ones may fill up your memory card quickly.
- Regular Maintenance: Frequently check and maintain your trail camera to ensure it’s functioning properly. Cleaning the lens, replacing batteries, and checking memory card capacity can prevent issues that compromise video quality.
- Review and Edit Footage: After capturing your videos, take the time to review and edit them. Trimming unnecessary parts and highlighting significant events can create more engaging content and enhance storytelling.
How Can You Edit Trail Camera Footage for the Best Viewing Experience?
Editing trail camera footage can enhance the viewing experience significantly by improving clarity, focus, and storytelling.
- Trimming Clips: Remove any unnecessary sections of the footage to focus on the most interesting parts, such as animal activity or notable events.
- Adjusting Brightness and Contrast: Enhance visibility by correcting the lighting in your footage, making it easier to see subjects in low-light conditions or during dusk and dawn.
- Adding Slow Motion: Apply slow-motion effects to highlight specific actions, such as a deer jumping or running, allowing viewers to appreciate the details that are often missed in real-time.
- Inserting Text Overlays: Use text overlays to provide context, such as the date, time, and location of the footage, or to label specific animals, which can engage viewers and enrich the narrative.
- Background Music or Sound Effects: Consider adding background music or natural sound effects to enhance the emotional impact of the footage and create a more immersive viewing experience.
- Creating a Montage: Combine multiple clips into a single montage to showcase a range of activities or different animals, which can be particularly effective for sharing on social media or at presentations.
Trimming clips can help in eliminating any long moments of inactivity, ensuring that viewers remain engaged with the most dynamic parts of the footage.
Adjusting brightness and contrast is crucial, especially if the footage was recorded during times of variable lighting; this adjustment can dramatically improve clarity and make details more discernible.
Incorporating slow-motion effects can transform the viewing experience by allowing audiences to appreciate the nuances of animal behavior and movements, which are often too fast to catch at normal speed.
Text overlays serve to educate viewers, providing them with important information about the footage, which can enhance their understanding and connection to the content.
Adding background music or sound effects can set a tone or mood that resonates with viewers, making the footage not just a visual spectacle but also an auditory experience.
Creating a montage allows for a better storytelling approach, where viewers can see a series of events unfold, giving them a broader perspective on the wildlife activity captured by the trail camera.
Related Post: