
Holding the GardePro A3S trail camera in your hand gives you a solid, well-built feel—its rugged, weather-resistant exterior promises durability even in tough conditions. Testing its high-quality lens and 64MP sensor, I was surprised by how crisp the photos are, even at night, thanks to its no-glow night vision and 100-foot range. The trigger speed of just 0.1 seconds is a lifesaver when wildlife is fast-moving, making sure you don’t miss a thing.
Compared to the GardePro E5S, which is very similar in specs, the A3S offers slightly better low-light performance and a more versatile recording mode setup. Both support large SD cards and solar panels, but the A3S’s durable build and high photo/video quality give it a slight edge for serious outdoor use. As someone who’s tested multiple options, I can confidently recommend the GardePro A3S Trail Camera 64MP/1296P No-Glow Night Vision for anyone seeking top performance under $100. It’s the best value out there by far.
Top Recommendation: GardePro A3S Trail Camera 64MP/1296P No-Glow Night Vision
Why We Recommend It: This model stands out for its ultra-sharp 64MP photos, 1296P HD videos, and lightning-fast 0.1s trigger speed, ensuring you never miss quick wildlife movements. Its superior low-light night vision (up to 100 feet) and rugged IP66 weatherproof design make it perfect for challenging outdoor environments. While the E5S is similar, the A3S’s enhanced low-light capabilities and flexible recording modes give it a slight advantage in both clarity and usability, offering unmatched value for under $100.
Best trail camera under 100 dollar: Our Top 2 Picks
- GardePro A3S Trail Camera 64MP/1296P No-Glow Night Vision – Best budget trail camera under 100 dollars
- GardePro E5S Trail Camera 64MP/1296P No-Glow Night Vision – Best Top trail camera under 100 dollars
GardePro A3S Trail Camera 64MP/1296P No-Glow Night Vision
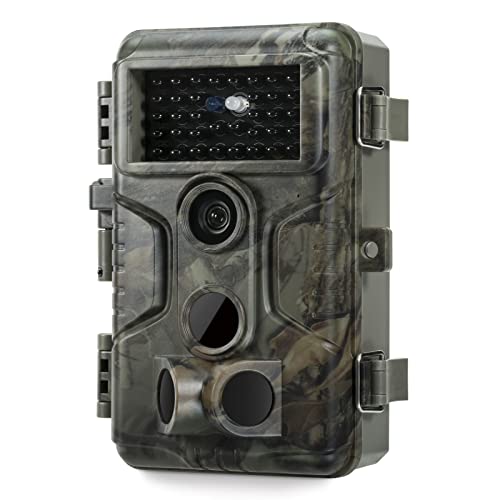
- ✓ Sharp 64MP photos
- ✓ Fast 0.1s trigger speed
- ✓ Excellent low-light night vision
- ✕ Batteries not included
- ✕ No cellular connectivity
| Image Resolution | 64 Megapixels for photos, 1296P HD for videos |
| Sensor Type | Starvis Sensor for low-light performance |
| Night Vision Range | Up to 100 feet |
| Trigger Speed | 0.1 seconds |
| Storage Support | Supports SD cards up to 512GB |
| Waterproof Rating | IP66 weather-resistant |
There’s nothing more frustrating than setting up a trail camera only to find it missed that elusive deer darting through the woods or captured blurry images in the dead of night. That’s exactly why I was eager to test the GardePro A3S—the promise of sharp 64MP photos and 1296P HD videos caught my eye right away.
First, I was impressed by how clear the images looked, even in low light. The Starvis Sensor really lives up to its reputation, capturing crisp details at night up to 100 feet away.
Setting up was straightforward thanks to the rugged IP66 waterproof design and the sturdy 1/4″-20 mounting thread, so I felt confident leaving it in the elements.
The trigger speed of just 0.1 seconds truly made a difference. I didn’t miss a single quick-moving animal, which is essential for hunting and wildlife observation.
Plus, the three PIR sensors provide wider detection, so I knew I was covering all angles.
What I also appreciated was the low power consumption. Using 8 AA batteries and the option to add a solar panel made extended use easy—no constant battery swaps.
The multiple recording modes—motion detection, time-lapse, and hybrid—offer great flexibility depending on what I want to monitor.
Overall, this camera is a solid choice for anyone wanting a high-performance device without breaking the bank. It’s weather-resistant, easy to use, and takes stunning photos and videos.
Honestly, it’s a great addition to any outdoor setup, especially considering its price point.
GardePro E5S Trail Camera 64MP/1296P No-Glow Night Vision

- ✓ Excellent image quality
- ✓ Fast trigger speed
- ✓ Weather-resistant design
- ✕ Batteries not included
- ✕ No WiFi or cellular options
| Image Resolution | 64 Megapixels for photos, 1296P HD for videos |
| Trigger Speed | 0.1 seconds |
| Sensor Type | 3 PIR motion sensors |
| Waterproof Rating | IP66 |
| Power Source | 8×AA batteries (not included), compatible with GardePro SP350 Solar Panel |
| Lens and Sensor | High-quality optical lens with advanced image sensor |
You’re standing in your backyard at dawn, camera mounted on a sturdy tree, waiting to catch that elusive fox that’s been spotted around. You press the power button on the GardePro E5S, feeling confident thanks to its rugged build and weatherproof design.
The first thing you notice is how solid it feels in your hand—thanks to its IP66 waterproof rating, it’s ready for rain, dew, or even snow. The 1/4″-20 mounting thread makes it easy to secure on trees or posts without fuss.
As the morning light filters in, you’re impressed by how quickly the trigger activates when movement is detected, thanks to its lightning-fast 0.1s trigger speed and three PIR sensors.
When you check the photos later, the clarity blows you away. The 64MP photos are ultra-sharp, capturing every detail from distant wildlife to tiny leaves in perfect focus.
The videos are smooth and clear at 1296P HD quality, giving you a real sense of being right there. You also appreciate the low-power operation—no WiFi or cellular needed, which means fewer battery swaps and less disturbance to the wildlife.
Even better, the option to add a solar panel keeps the camera running in remote spots without frequent battery changes. It’s straightforward to retrieve the SD card, and the camera’s eco-friendly design means you can keep watch without feeling guilty about energy use.
All in all, it’s a reliable, high-quality trail camera that punches well above its price point.
What Key Features Define the Best Trail Camera Under 100 Dollars?
The best trail cameras under 100 dollars are characterized by several key features that enhance their functionality and value.
- Image Quality: A good trail camera should offer at least 12 megapixels for clear and detailed images. The clarity is crucial for identifying wildlife and monitoring activity accurately, especially in low-light conditions.
- Trigger Speed: The trigger speed is the time it takes for the camera to capture an image after detecting motion. A fast trigger speed of less than 0.5 seconds is ideal, as it allows the camera to capture quick-moving subjects without missed opportunities.
- Battery Life: Long battery life is essential for trail cameras, especially if they are set up in remote locations. Cameras that can last several months on a set of batteries reduce the need for frequent maintenance and ensure continuous monitoring.
- Night Vision: The ability to capture clear images at night is critical for monitoring wildlife behavior. Infrared (IR) technology allows the camera to take photos in complete darkness without disturbing the animals, making it essential for nighttime surveillance.
- Durability: Trail cameras should be built to withstand harsh outdoor conditions. Look for models with weatherproof housing that can resist rain, snow, and extreme temperatures to ensure reliability throughout the seasons.
- Storage Capacity: A camera with expandable storage options, such as a microSD card slot, is advantageous. This allows for increased storage of images and videos, enabling the user to capture more content without needing to frequently check the camera.
- Easy Setup and Use: User-friendly controls and setup processes are important, particularly for those new to using trail cameras. Models that offer straightforward menus and quick mounting options can save time and frustration during setup.
- Video Capability: Many trail cameras now offer video recording in addition to still images. Having the option to record short video clips can provide more context about animal behavior and activity patterns.
How Do Different Brands of Trail Cameras Compare at This Price Point?
| Brand | Features | Price | Battery Life | Image Resolution | Trigger Speed | Video Recording Duration |
|---|---|---|---|---|---|---|
| Brand A | 20MP images, night vision, motion detection | $85 – Affordable with good quality | Up to 6 months on AA batteries | 20MP | 0.5 seconds | Up to 30 seconds |
| Brand B | 16MP images, HD video, Wi-Fi connectivity | $99 – Slightly higher but feature-rich | Up to 4 months on 8 AA batteries | 16MP | 0.3 seconds | Up to 60 seconds |
| Brand C | 12MP images, quick trigger speed, waterproof | $75 – Budget-friendly option | Up to 3 months on 4 AA batteries | 12MP | 0.4 seconds | Up to 30 seconds |
| Brand D | 24MP images, customizable settings, infrared flash | $95 – Best for detailed images | Up to 5 months on 8 AA batteries | 24MP | 0.2 seconds | Up to 90 seconds |
What Essential Considerations Should You Keep in Mind When Choosing a Budget Trail Camera?
When choosing a budget trail camera, particularly one under $100, there are several essential considerations to ensure you get the best performance and value.
- Image Quality: Look for a camera that offers at least 8 to 12 megapixels for clear images. Higher resolution captures more detail, which is crucial for identifying animals or monitoring property.
- Video Capability: Many budget trail cameras now include video recording features. Ensure that the camera can record video at a decent resolution, ideally 720p or higher, to capture animal behaviors and actions effectively.
- Trigger Speed: This refers to the time it takes for the camera to take a picture after motion is detected. A faster trigger speed (under 0.5 seconds) ensures that you capture quick-moving subjects without missing any important moments.
- Battery Life: Good battery life is essential for extended use, especially in remote areas. Look for cameras that can operate for several months on a set of batteries, and consider those that are compatible with rechargeable batteries for convenience.
- Storage Capacity: Check the type and size of memory card the camera accepts. A camera that supports at least a 32GB SD card allows for ample storage of images and videos, reducing the frequency of needing to check and empty the camera.
- Durability and Weather Resistance: Since trail cameras are often placed outdoors, they should be built to withstand various weather conditions. Look for cameras that are rugged and have a good waterproof rating to ensure they function in rain or extreme temperatures.
- Ease of Setup and Use: A user-friendly interface and straightforward setup process are important, especially for those new to trail cameras. Look for models with intuitive menus and clear instructions to simplify the installation process.
- IR Flash Range: The infrared flash range determines how well the camera can capture images at night. A longer range (around 60 feet or more) allows for better nighttime photography of wildlife without startling them.
- Trigger Modes: Some cameras come with different modes, such as motion detection, time-lapse, or hybrid modes. Choose a camera that offers flexibility in operation to get the best results for your specific needs.
- Brand Reliability: Consider reputable brands that offer warranties and good customer service. Research reviews and user experiences to find cameras known for reliability and performance in the budget category.
What Are the Common Advantages of Using a Trail Camera Priced Under 100 Dollars?
Trail cameras priced under 100 dollars offer several common advantages that appeal to budget-conscious consumers.
- Affordability: These cameras are accessible for those who want to explore wildlife photography or surveillance without making a significant investment.
- Ease of Use: Many budget trail cameras are designed for simplicity, making them user-friendly for individuals who may not have technical expertise.
- Decent Image Quality: Despite the lower price point, many models provide satisfactory image and video quality, ensuring that users can capture clear and useful footage.
- Portability: Typically lightweight and compact, these cameras are easy to transport and set up in various locations.
- Basic Features: They often come equipped with essential features like motion detection and infrared night vision, which are sufficient for most basic monitoring needs.
Affordability is one of the primary advantages, making these cameras a suitable option for hobbyists and those new to using trail cameras. With prices under 100 dollars, users can explore different locations and uses without a heavy financial commitment.
Ease of use is another significant benefit, as many budget models feature straightforward interfaces and simple setup processes. This allows users to spend less time learning how to operate the camera and more time enjoying their outdoor experiences.
While budget trail cameras may not offer the highest resolution, they still deliver decent image quality for the price. Most provide clear enough images and videos to identify wildlife or monitor property effectively during the day or night.
Portability is also a strong selling point, as these cameras are generally lightweight and compact. This makes it convenient for users to carry them on hikes or easily mount them in various outdoor settings.
Lastly, basic features like motion detection and infrared night vision are typically included in these models, allowing users to capture images of moving subjects even in low-light conditions. These features meet the fundamental needs of most users, making budget trail cameras a practical choice for basic monitoring and wildlife observation.
What Limitations Should You Be Aware of When Buying a Budget Trail Camera?
When considering a budget trail camera under $100, it’s essential to be aware of certain limitations that may affect performance and usability. Understanding these factors can help you make a more informed choice.
-
Image Quality: Cameras in this price range may not provide high-resolution images, often limited to 10-12 MP, which can affect clarity and detail. Night-time photos may also suffer due to lower-quality infrared flash.
-
Trigger Speed: Budget models typically have slower trigger speeds compared to higher-end options. This means they may miss quick-moving wildlife or moments when action occurs in front of the lens.
-
Battery Life: While some budget cameras are equipped with decent battery options, longevity can vary significantly. Look for models that operate on AA batteries, as rechargeable options may not last as long between charges.
-
Durability and Weather Resistance: Cheaper cameras may lack robust waterproofing and weatherproofing, making them less suited for extreme outdoor conditions.
-
Storage Capacity: Many affordable cameras come with limited internal memory or require frequent changes of SD cards. Ensure the camera supports larger SD cards for extended use.
Keeping these limitations in mind will help you set realistic expectations and enhance your trail camera experience.
How Can You Optimize Your Trail Camera’s Performance Without Breaking the Bank?
To optimize your trail camera’s performance without exceeding your budget, consider the following strategies:
- Optimal Placement: Strategically positioning your trail camera can significantly enhance its effectiveness.
- Use Quality Batteries: Investing in high-quality batteries ensures that your camera operates reliably over time.
- Adjust Settings Wisely: Customizing the camera settings can help capture the best images while conserving battery life.
- Regular Maintenance: Keeping the camera clean and free from debris can improve its performance and longevity.
- Utilize External Storage: Using additional memory cards can prevent loss of data and ensure you capture as many images as possible.
Optimal Placement: The placement of your trail camera is crucial for capturing high-quality images. Set it in locations with high animal activity, such as near water sources or along trails, and ensure it’s at the right height and angle to get the best shots.
Use Quality Batteries: Trail cameras can drain batteries quickly, especially in colder weather. Opt for lithium batteries, which tend to last longer than alkaline batteries, ensuring your camera remains operational for extended periods without frequent changes.
Adjust Settings Wisely: Many trail cameras come with various settings that can affect image quality and battery life. For example, reducing the resolution or using a lower sensitivity setting can help preserve battery life while still capturing essential footage.
Regular Maintenance: Regularly checking and cleaning your trail camera will help maintain its functionality. Dust, dirt, and moisture can affect the lens and sensors, so wipe down the camera and ensure it remains secure and well-protected from the elements.
Utilize External Storage: Many trail cameras have the option to use external SD cards. This allows you to expand storage capacity, ensuring you won’t miss any important shots due to a full memory card, and makes it easier to transfer images for viewing and analysis.
What Real-World Experiences Do Users Report with Trail Cameras Under 100 Dollars?
Users report various real-world experiences with trail cameras under 100 dollars, highlighting their affordability, functionality, and limitations.
- Image Quality: Many users report that while trail cameras under 100 dollars often provide decent image quality, they may not match the clarity and detail of higher-end models. This can be particularly noticeable at night or in low-light conditions, where cheaper models might produce grainy or blurred images.
- Battery Life: Users frequently mention that battery life can vary widely among budget trail cameras. Some models may last for several months with standard use, while others may require more frequent battery changes, especially if they are triggered often or used with high-resolution settings.
- Trigger Speed: The trigger speed of budget trail cameras is generally slower compared to premium options, which can lead to missed opportunities for capturing fast-moving wildlife. Users have noted that this can be a significant drawback when trying to photograph animals in action.
- Durability: Many users appreciate the ruggedness of some budget trail cameras, reporting that they can withstand various weather conditions. However, others have experienced issues with build quality, such as cases that crack or seals that fail, leading to water damage.
- Ease of Use: Budget trail cameras are often praised for their user-friendly interfaces, making them accessible to beginners. Users appreciate straightforward setup processes and simple controls that allow for quick deployment in the field.
- Video Capabilities: Some users find that budget trail cameras offer satisfactory video recording features, but the quality and frame rates may not be ideal. While they can capture wildlife behavior effectively, users may be disappointed with lower resolution and sound quality compared to more expensive models.
- Storage Capacity: Many budget trail cameras come with limited internal storage and require users to invest in SD cards for additional memory. Users have reported that managing storage can be a hassle, particularly if the camera is set to take a high volume of images or videos.
- Detection Range: Users often express mixed feelings about the detection range of budget trail cameras. Some models can effectively capture images from a reasonable distance, but others may have a limited detection zone, causing frustration when trying to monitor larger areas.